
A community e-waste drive can give old electronics a safer next stop - but drop-off alone doesn’t prove recycling. Before I bring a device, I check accepted items, fees, battery rules, and how my data will be handled.
With the right follow-through, these drives can:
Keep electronics out of landfills to mitigate the problems of electronic waste through proper collection and processing.
Recover materials and reuse devices after repair and data sanitization.
Teach safe disposal, including where to take batteries and rejected items.
Build community partnerships with clear roles for schools, businesses, and local groups.
Make handling easier to verify through pickup receipts, transfer logs, and processing records.
The scale can add up: a 2005 drive in Sidney, Montana, collected 4.2 tons from 23 vehicles.[9] But I look for confirmed results, not just collection totals. Safe storage, documented data handling, and a checked recycler help turn a collection event into results organizers can report.
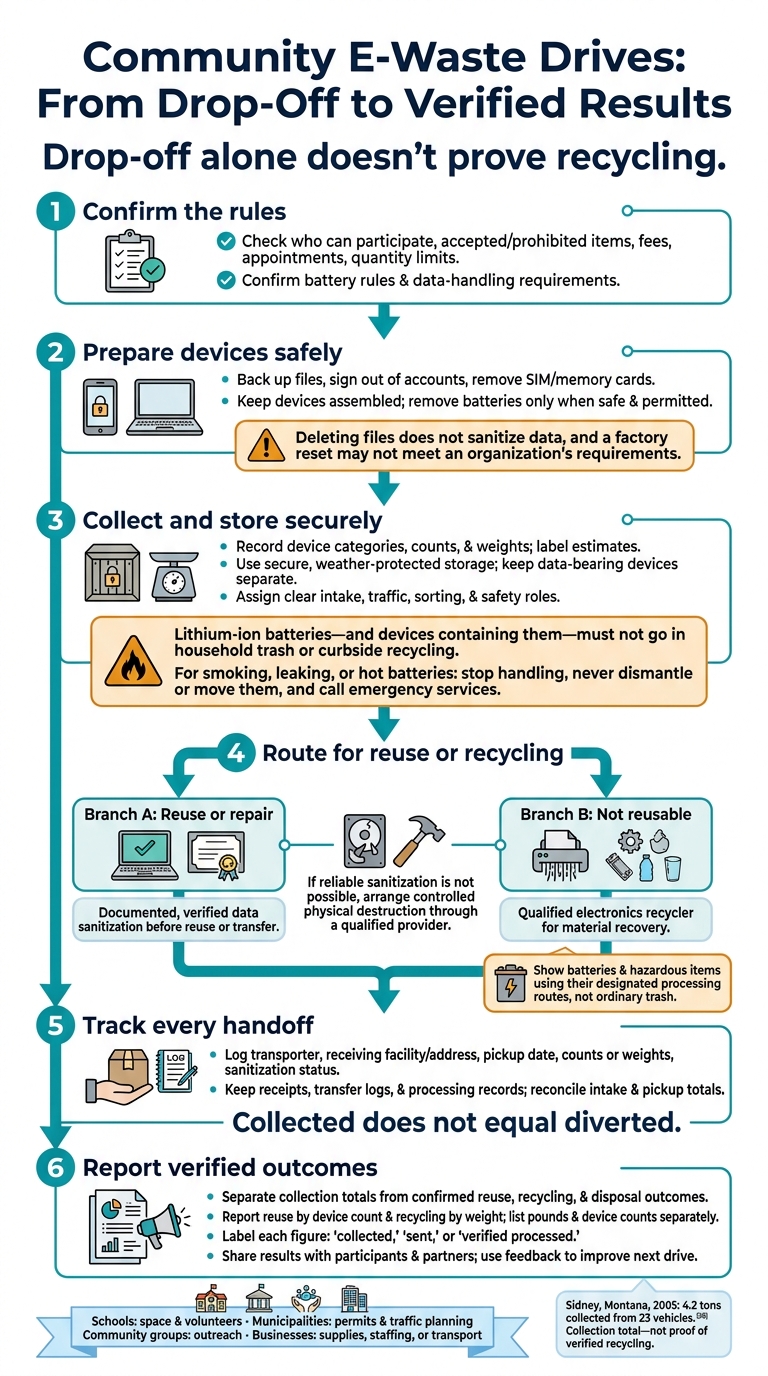
Community E-Waste Drives: From Drop-Off to Verified Results
e-Waste | How Your Old Gadgets Impact the Environment | eWaste | The Planet Voice
Accepted Electronics and Drop-Off Rules
Once the event is announced, clear drop-off rules help people prepare and keep the line moving. State who can participate: local households, schools, businesses, nonprofits, government offices, or a mix of these groups. Explain residency rules, quantity limits, and booking requirements. Larger loads from organizations may require an appointment and an equipment inventory.
Name accepted and prohibited items, including computers, monitors, TVs, phones, printers, and cables. Confirm whether working and nonworking devices qualify. Label each category as free, fee-based, or appointment-only. Include the event address, date, hours, drop-off entrance, unloading process, fees, and payment method. These details help people take part without bringing items that will be turned away.
Give batteries and large appliances their own handling instructions. Explain whether removable batteries need taped terminals, individual bags, or a separate collection station. Never ask participants to dismantle swollen, leaking, punctured, or hot batteries. Instead, direct them to the coordinator or a hazardous-waste program. Lithium-ion batteries - and devices containing them - must not go in household trash or curbside recycling. List appliances separately, with accepted items, fees, and loading requirements.
Before drop-off, participants should back up needed files, sign out of accounts, remove SIM and memory cards, and reset devices where appropriate. Deleting files does not sanitize data, and a factory reset may not meet an organization’s requirements. Schools and businesses should follow approved asset-disposition procedures for confidential data, using documented media sanitization or physical destruction when required.
Keep devices assembled, pack loose cables in a separate box, and load equipment so it can be unloaded safely. Bring any required proof of residency or authorization. For equipment that stores data, confirm which handling records the event provides: a receipt, serial-number tracking, or a certificate of destruction.
1. Keep Electronics Out of Landfills
A convenient collection site, clear hours, and reminders make responsible disposal easier. Residents get a practical alternative to throwing electronics in the trash, dumping them illegally, or storing them long-term. Proper handling keeps hazardous materials such as lead and mercury out of the environment.[7][8] Event totals help show the difference.
For example, a 2005 e-waste drive in Sidney, Montana, collected 4.2 tons from 23 vehicles and was credited with keeping electronics and hazardous materials out of the local landfill.[9]
Document those totals. Record pounds collected, device counts by category, and the number of participating households or organizations. Note whether weights were measured or estimated. A short intake survey can reveal where devices were stored and what participants would have done without the event. That provides evidence of disposal behavior - not proof of recycling.
Collected does not equal diverted. Request weight tickets or material receipts, along with a post-event report showing quantities sent for reuse, material recovery, battery or hazardous-waste processing, or disposal.[8] Publish collection totals first and confirmed outcomes separately. Avoid “100% recycled” or “zero waste” claims unless processing records support them.[4]
2. Recover Materials and Reuse Electronics
After collection, the next step is to route each item to reuse, repair, or recycling.
Sort for reuse first. Separate devices into reusable, repairable, data-bearing, and scrap streams. Record each item’s type, quantity, condition, and intended destination. Send equipment that can’t be reused to a qualified electronics recycler.[5]
Data-bearing devices need documented sanitization before reuse or transfer. Deleting files or performing a factory reset isn’t enough. Verify the results and record what was sanitized, when, how, and its final disposition. If reliable sanitization isn’t possible, arrange controlled physical destruction through a qualified provider.[6][10]
Qualified recyclers process electronics that can’t be reused, recovering metals, plastics, glass, and circuit boards for manufacturing supply chains.[5]
Before scheduling a drive, check the recycler’s current certifications, accepted materials, and data-destruction procedures.
The paper trail proves the drive’s impact. Document every transfer to the receiving vendor or processor. Record the recipient, date, counts or weights, serial numbers for managed assets, and sanitization status.[6][5]
3. Teach Safe Electronics Disposal
Residents should leave the drive knowing what to do with electronics they keep, replace, or can’t drop off. Set up an information station near the unloading area with a clear accepted-items poster and a one-page takeaway handout. Explain where to take items the drive doesn’t accept.
Give the handout four short sections: accepted electronics, prep steps, data protection, and local drop-off options. Tell residents to back up files, sign out of accounts, remove SIM and memory cards, and ask about documented data destruction for devices that hold sensitive information. Offer printed copies and a QR code, and keep the wording and layout easy to follow.
Teach battery safety separately. Lithium-ion batteries and battery-powered devices don’t belong in household trash or curbside recycling. Remove batteries only if the device allows safe removal. Tell residents to alert staff about swollen, leaking, hot, or damaged batteries - not put them in a collection box. This guidance helps residents handle items that need a different collection route.
For items the event can’t take, direct residents to the right local program. Add a “Need another drop-off site?” box with city or county household hazardous-waste contacts and approved battery drop-off locations. Include this brief note:
Check hours, fees, appointments, and quantity limits before traveling.
An item the drive rejects isn’t automatically safe for the trash. Point residents to a designated local program instead.
4. Build Community Partnerships
Once drop-off rules are clear, local partners can help promote and run the drive, making it easier for more people to take part. Share the responsibilities, not just the flyer. Schools can offer parking lots, classrooms, and student volunteers. Municipalities can help with permits, traffic planning, and public announcements. Nonprofits and neighborhood groups can recruit participants, while businesses can sponsor supplies, staff the event, or provide transportation.[11] Clear roles keep the event organized and help prevent drop-off delays.
Choose one project manager and assign specific duties so intake stays accurate and downstream processing is documented. Traffic staff direct vehicles, intake staff screen items, and sorting teams follow the recycler’s instructions. Designate one lead to answer questions. Schedule enough staff for setup and cleanup, and confirm who will load materials and arrange pickup.[11]
Give every partner the same event fact sheet with the date, time, location, accepted and excluded items, and cost. This helps prevent confusion and keeps people from arriving with items you can’t accept.[12]
Within one week after the event, hold a short partner debrief to review turnout, wait times, and safety issues. Identify changes for the next collection, assign fixes, send a brief results report, and confirm who owns each follow-up task.
5. Make E-Waste Handling Easier to Verify
Partnerships bring people in. Records show what happens next. Document staff training on battery hazards, broken screens, labeling, and data security.
Keep e-waste in a secure, weather-protected storage area. Label containers, stack items safely, and photograph the space. Log arrival dates, approximate quantities, and damaged items. These photos and logs help verify custody before pickup.
Track every move from intake to pickup. Log each handoff, including the transporter, receiving facility and address, pickup date, and measured weights or counts. Compare intake totals with pickup receipts and investigate any unexplained differences.
In California, check current Department of Toxic Substances Control (DTSC) requirements before promoting the drive.[13][14]
Publish only documented reuse, recycling, and disposal outcomes. Clearly label estimates so readers can distinguish verified diversion numbers from estimates.
Event Safety and Planning Checklist
Use this checklist to keep the drive safe, compliant, and easy to verify.
Check the site and traffic route. Confirm permission, required permits, and enough room for unloading, sorting, and collection vehicles. Provide accessible parking and routes. Use a one-way vehicle loop where possible, keep pedestrians away from loading areas, and leave fire lanes clear. Post the rules online and at the entrance.
Assign roles before opening. Name a site lead, intake checker, traffic marshal, and emergency contact. Brief volunteers on lifting, protective equipment, prohibited items, and when to stop intake. Prepare procedures for injuries, vehicle collisions, severe weather, spills, power outages, and fire hazards. Isolate smoking, leaking, or hot batteries and call emergency services. Never dismantle or move them.
Set storage and data controls. Arrange prompt pickup and storage with restricted access. Keep data-bearing devices separate. Accept them only with documented sanitization or destruction requirements.
Verify the recycler and event terms. Request proof of authorization, insurance, and required certifications. Confirm where materials go after pickup. Before advertising, get written confirmation of accepted items, fees, minimum quantities, staffing, loading requirements, data-destruction steps, certifications, and documentation. Assign someone to record material categories, quantities, and transfers for applicable reports. Check whether state reporting rules require specific logs or advance notice before the event.[15]
Conclusion: Share Results and Plan the Next Drive
After drop-off, report verified outcomes, not just collection totals.
List pounds and device counts separately. Include verified processing results, with reuse reported by device count and recycling by weight. Label each figure as collected, sent, or verified processed.[16]
Use those results to plan the next drive. Share repair, donation, and battery drop-off options, along with battery-handling guidance. Remind participants that lithium-ion batteries - and devices containing them - do not belong in household trash or recycling bins.[3]
Send the summary to participants and partners. Ask participants about wait times, unclear rules, and rejected items. Review their feedback with partners, make one concrete fix - such as clearer accepted-item notices - and set the next date.
FAQs
How much does hosting an e-waste drive cost?
Hosting an e-waste drive can keep costs low. Many certified recyclers participate for free, and most standard electronics can be recycled at no charge. Still, budget for venue rentals, signage, permits, and services such as secure data destruction.
Some items come with fees. Rica Recycling, for example, charges $50 per appliance for drop-off. Set aside an extra 10% to 15% of your budget for unexpected costs, and request written quotes for pickup and data destruction.
How can I verify a recycler’s certifications?
Look for recognized certifications such as R2 (Responsible Recycling) or e-Stewards. Verify R2 credentials on the Sustainable Electronics Recycling International (SERI) website.
Ask for proof of certifications, insurance coverage, and compliance with local laws. Also request a written downstream processing policy. Confirm that the recycler provides serialized Certificates of Data Destruction aligned with NIST 800-88 standards for every data-bearing device.
What if my device won’t turn on for data removal?
If your device won’t turn on, you can’t perform a standard software wipe or factory reset. Keep it separate from working equipment and record it in your inventory to maintain its chain of custody [1].
Physical destruction, such as shredding or crushing, is the safest way to make the data unrecoverable [1]. Rica Recycling offers certified destruction services and provides a Certificate of Data Destruction for your records [2][1].