
Portable XRF for On-Site E-Waste Analysis
I use portable XRF to guide e-waste sorting - not to make a final hazardous-waste determination. My starting rule: test several representative spots, record instrument checks, and hold uncertain materials for laboratory testing.
Here’s what I keep in focus:
What readings mean: XRF detects elements, not chemical forms. A chromium reading cannot confirm hexavalent chromium, and nondetect does not mean absent.
How I test: Surface condition, layers, and sample preparation affect results. I compare matching units: 10,000 ppm equals 1% by mass.
When I seek confirmation: Near-threshold, inconsistent, or low-confidence readings need further testing.
How I handle materials: I follow radiation-safety procedures and California storage, labeling, and transfer rules. <u>A screening result does not authorize disposal in ordinary trash.</u>
What I document: I link test results to sorting, laboratory reports, and recycling records. For Bay Area recycling with Rica Recycling, I confirm accepted materials and keep data-destruction records separate.
My goal is a clear path from screening to safe handling, confirmation, and documented recycling.
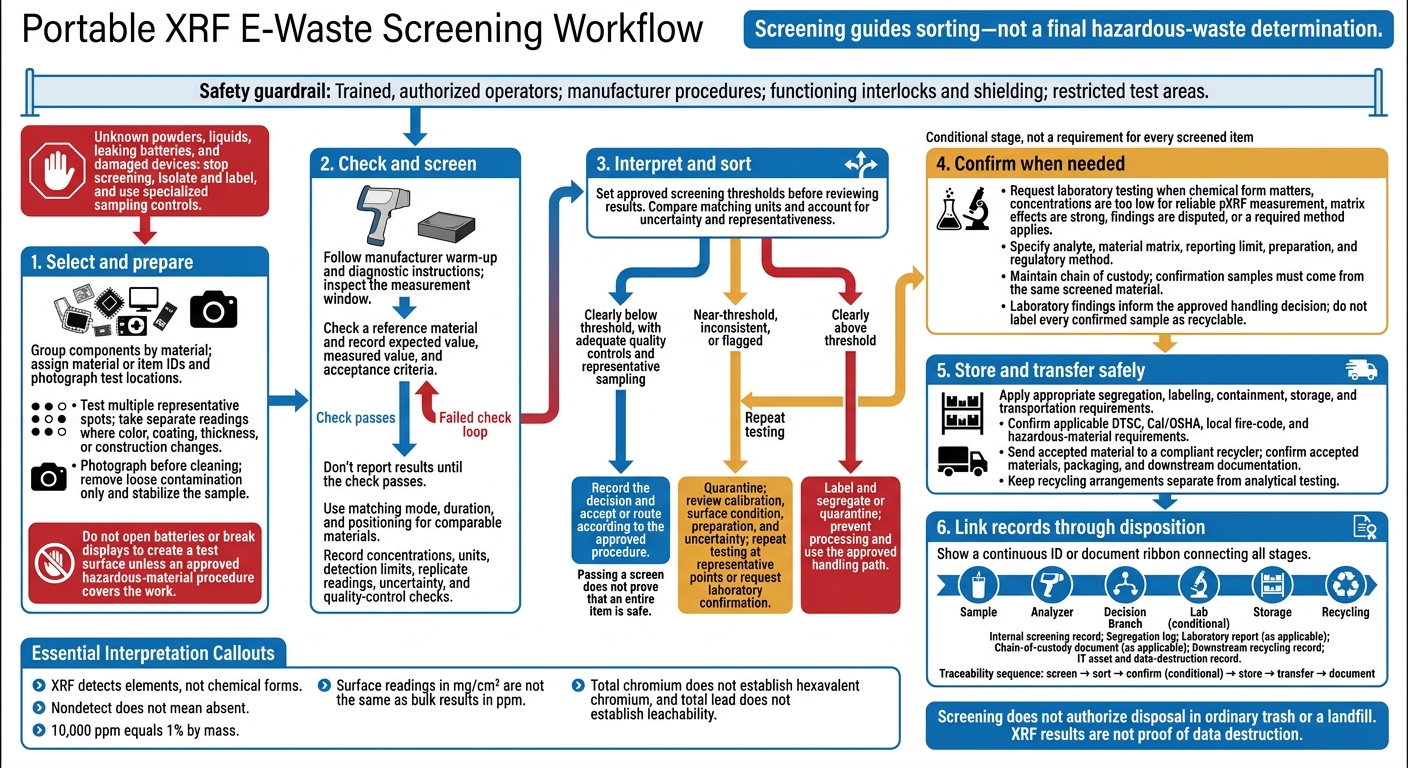
Portable XRF E-Waste Screening Workflow
How to Use a Handheld XRF to Test Metals
Preparing Samples and Testing On-Site
pXRF reads only the exposed surface. How you select and prepare samples determines whether the results can guide recycling decisions.
Select Materials and Test Points
Each reading covers the exposed spot - not the whole device.[7][9] Group housings, solder, cable insulation, connectors, and board regions by material. Assign each item an ID, and use photographs to map test locations. Take separate readings wherever color, coating, thickness, or construction changes. Don’t combine unrelated components into one result.
Photograph the surface before cleaning. Remove loose contamination only, leaving the layer you’re testing in place. Keep the measurement window flush against the surface, and use a fixture or sample cup for small or uneven parts. Small solder joints may not cover the entire window, allowing surrounding material to affect the reading.
Do not open batteries or break displays to create a test surface unless an approved hazardous-material procedure covers the work.
Check the Instrument and Record Results
Follow the manufacturer’s warm-up and diagnostic instructions. Inspect the measurement window, then check performance with a reference material. Record the expected value, measured value, and acceptance criteria. Don’t report results until the check passes.
Use the same mode, duration, and positioning for comparable materials. If readings disagree, check surface contact, cleanliness, settings, and covered layers before repeating the measurements.
Matrix composition can suppress or boost elemental signals. Thickness, moisture, particle size, and uneven surfaces can also affect readings. A thin coating, for example, may produce a result that combines the coating and substrate.[4][5]
Record the operator, date and time, instrument model and serial number, material ID, exact test point, preparation steps, surface condition, and measurement duration. Include concentrations, units, reported detection limits, replicate results, and quality-control checks. Keep records of failed checks and deviations, too.
Compare Sample Preparation Methods
Choose the least aggressive preparation method that still provides a representative surface.
Approach | Best use | Preparation needs | Main error risks | Laboratory confirmation |
|---|---|---|---|---|
Intact item or component | Accessible, stable surfaces | Remove loose contamination; stabilize the component | Curvature, overlap, thin material, incomplete window coverage | Overlapping layers, variable results, near-threshold readings |
Prepared solid | Safely separated, representative pieces | Controlled cutting or separation; clean tools; stable positioning | Tool contamination, material loss, altered surfaces | Preparation changes; compliance decisions |
Loose material | Fragments, granules, processed lots | Controlled mixing, size reduction, moisture control; clean sample cups | Segregation, dust loss, moisture, incomplete mixing | Verification of representativeness or quantitative accuracy |
Preparation errors matter most when results fall near a decision threshold.
Use clean tools and containers. Dry or size-reduce material only under a procedure that prevents analyte loss. Avoid heating or aggressive grinding that could change its composition, and document every preparation step. If you can’t safely homogenize the material, keep the components intact and request laboratory assistance.[6][8]
Next, compare the prepared readings with detection limits and handling thresholds to determine whether the material needs segregation, confirmation, or laboratory testing.
Interpreting and Confirming XRF Results
Interpret readings in the context of the method, calibration, quality controls, and sampling plan. EPA Method 6200 treats pXRF as a field-screening method and requires calibration checks and a sampling plan.[4][14]
Understand Concentrations and Detection Limits
Surface readings in mg/cm² are not the same as bulk results in ppm. Review each result alongside its uncertainty, detection or reporting limit, and instrument flags.
Nondetect does not mean absent. It means the element was not reliably detected under those test conditions. Detection limits depend on the element, instrument, calibration, measurement time, and material. Even nearby test points can produce different results, so one reading cannot stand for an entire device or lot.[11][12][13]
Short measurements can reduce precision and increase detection limits. Surface readings may miss metals hidden in layered parts. Coatings, surrounding elements, and geometry can also skew sorting decisions.
Use these limits to decide whether a reading supports sorting or needs another test. Low-confidence readings need repeat testing or laboratory confirmation.
Use Screening Results to Guide Material Handling
Set approved screening thresholds before reviewing results. Base them on the material, the decision being made, the instrument method, and any regulatory or customer requirements. Compare results in matching units, and account for uncertainty and how well the samples represent the material. Passing a screen does not prove that an entire item is safe.[10]
Finding | Handling decision |
|---|---|
Clearly below threshold, with adequate quality controls and representative sampling | Record results, uncertainty, test points, and the reason for the decision. Accept or route the material according to the approved procedure. |
Clearly above threshold | Label and segregate or quarantine the material. Prevent processing and route it to the approved handling path. |
Near-threshold, inconsistent, or flagged | Quarantine the material. Review calibration, surface condition, preparation, and uncertainty. Repeat testing at representative points or request laboratory confirmation. |
Document any change in the handling path. Seek confirmation when readings are near the threshold, do not represent the material, or are otherwise unsuitable for the decision.
When to Request Laboratory Testing
Request laboratory testing when the chemical form matters, concentrations are too low for reliable pXRF measurement, matrix effects are strong, or findings are disputed. Testing is also needed when a regulation, permit, customer, or waste profile requires a specified method.
Total chromium does not establish hexavalent chromium, and total lead does not establish leachability. Elemental totals alone do not determine hazardous-waste status under federal or California rules. In the laboratory request, specify the analyte, material matrix, required reporting limit, preparation, and regulatory method.[4][11]
Unknown powders, liquids, leaking batteries, and damaged devices require specialized sampling controls. Stop screening, isolate and label the material, and use trained personnel, compatible containment, and exposure controls.
For laboratory confirmation, maintain chain of custody. Include sample IDs, collection location and time, the sampler, preservation requirements, custody transfers, and requested analyses. Damaged batteries may also need separate fire and transportation controls.
After documenting screening decisions, address radiation controls and California handling rules before recycling or transport.
Radiation Safety and California E-Waste Rules
Once screening flags suspect material, move from detection to safe handling and compliance with California rules.
Control Radiation and Material Hazards
Analyzer safety and e-waste safety need separate controls. Only trained, authorized operators should use the analyzer. Follow written radiation procedures and the manufacturer’s manual. Use working interlocks and shielding, conduct pre-use inspections, restrict test areas, post warning signs, and secure the equipment in storage.
Never point the analyzer at anyone or bypass its safety features. Confirm registration, training, inspection, and radiation-safety-officer requirements with the California Department of Public Health Radiologic Health Branch (CDPH RHB) and local radiation or environmental authorities. California guidance calls for documented initial and continuing training, posted operating instructions, an ALARA radiation-protection program, and an annual program review.[16][19][21]
Control dust and provide ventilation. Wear eye protection, cut-resistant gloves, protective footwear, and respirators when the hazard assessment requires them. Place leaking batteries in compatible, labeled containment. Package broken displays and sharp parts to prevent cuts and punctures.
Check current DTSC, Cal/OSHA, local fire code, and hazardous-material requirements for storage, emergency response, and transportation. Universal-waste handling does not remove hazardous-waste obligations. Screening does not authorize disposal in ordinary trash or a landfill.[1][2][15][17]
Once hazards are controlled, record how each item was segregated, confirmed, stored, or shipped.
Keep Screening and Recycling Records
Screening records support compliance; they do not replace it. Verify labeling, accumulation limits, containment, transportation, and downstream requirements with DTSC for your materials and activities.
Some off-site handlers must file a Notice of Intent at least 30 days before starting. DTSC also uses annual-report triggers such as 11,000 pounds generated on-site, 220 pounds accepted from off-site without treatment, or any e-waste treatment or recycling.[18][20][25]
Connect records throughout the workflow: screen → sort → confirm → store → transfer → document.
Record | Purpose | Information to retain |
|---|---|---|
Internal screening record | Connects screening decisions to handling | Asset or lot ID, test point, screening pass/fail decision, container ID, disposal path, storage location |
Segregation log | Tracks separation and storage after screening | Container ID, material category, quantity or weight, location, movement date, responsible employee |
Laboratory report | Supports decisions that need confirmation | Laboratory, method, preparation, results, reporting limits, quality controls |
Chain-of-custody document | Tracks samples sent for confirmation | Sample IDs, seals, signatures, transfer dates and times, receipt condition |
Downstream recycling record | Documents transfer and disposition of sorted material | Receiving facility, authorizations or certifications, shipment date, weights, transport details, acceptance and disposition records |
IT asset and data-destruction record | Tracks equipment and information-security controls | Serial number, asset tag, custody status, destruction or sanitization method, completion date, certificate or internal approval |
Link material identifiers to IT asset inventories, but XRF results are not proof of data destruction. Keep separate records for media sanitization or physical destruction. Set retention periods based on applicable DTSC, CDPH, contractual, and information-security requirements - not a single deadline for every record.
After screening, segregation, and documentation, send accepted material to a compliant recycler.
Plan E-Waste Recycling With Rica Recycling
Rica Recycling provides certified electronics recycling and IT asset recovery in the San Francisco Bay Area, including pickup, drop-off, and secure data destruction.
Before arranging service, share inventories, quantities, relevant screening findings, battery or display hazards, and data-security needs. Keep recycling arrangements separate from analytical testing. Confirm accepted materials, packaging, certification scope, downstream documentation, pricing, and service terms directly with Rica Recycling.[22][23][24]
Conclusion: Document Screening and Recycling Decisions
Portable XRF screening is fast and non-destructive, but it guides sorting - not a final determination. Use multiple representative test points for each material and document instrument checks so readings can support sorting. When results are uncertain, seek confirmation rather than force a screening decision.
Request laboratory confirmation when results fall near a decision threshold, the material’s matrix is hard to measure reliably, or the decision requires defensible analytical support. Confirmation samples must come from the same screened material.[4] If screening and confirmation agree, document the decision and route the material. Screening does not replace hazard controls.
For Bay Area organizations, each asset or batch needs a traceable decision: screen, confirm, document, route. Record raw readings, uncertainty, approval, and the final destination. Route approved assets to secure data handling and recycling with Rica Recycling. XRF screening alone does not prove compliance or data security.
FAQs
How many XRF readings should I take per e-waste lot?
The provided search results don’t specify a required number of XRF readings per e-waste lot. How many readings you need depends on how much the material varies and your recycling goals. Take multiple readings across different areas of the lot to account for differences in composition and get data that represents the lot.
For guidance on screening protocols for your specific e-waste streams, contact our team at Rica Recycling.
What if XRF and laboratory results disagree?
Each method has a different role. XRF offers fast, on-site screening, though complex materials may need adjustments to get accurate results. Laboratory chemical analysis is generally the standard for regulatory compliance and precise measurements of compound concentrations.
Chemical analysis measures specific toxins. Biological assays assess their combined effects on health and the environment. Using both methods gives a more complete picture of safety and regulatory compliance.
How do I set XRF sorting thresholds?
Set XRF sorting thresholds by calibrating the device to identify specific atomic densities or chemical elements. These settings can help separate aluminum alloys or detect precious metals [1]. Match the calibration to your material stream so the device can accurately tell materials apart [1][2].
For help with your e-waste inventory, contact Rica Recycling at (510) 780-9668 or visit our Hayward, California facility for professional e-waste management and material recovery assistance [3].