
5 Data Encryption Practices for ITAD Security
A retired device can still expose data if encryption, key control, status checks, and records are not handled the right way. In the source article, the main takeaway is simple: encrypt before pickup, keep keys off the device, use cryptographic erase where it fits, verify before release, and log every handoff and sanitization step.
Here’s the short version I’d want a reader to get right away:
Encryption at rest protects devices during storage, staging, and transport —often managed through professional electronics waste pick-up
Keys must stay separate from the hardware, usually in a KMS or HSM
Cryptographic erase works for supported encrypted SSDs and SEDs by destroying the key
Verification is a release gate because policy status is not the same as device status
Device-level records matter for audits, chain of custody, and legal review
The risk is not small. The article notes that a 2024 Verizon analysis found 91% of data breach incidents involved lost or stolen assets, and 88% of those assets were lost, not stolen. It also points out that under rules like HIPAA, a lost encrypted device may be treated very differently from an unencrypted one.
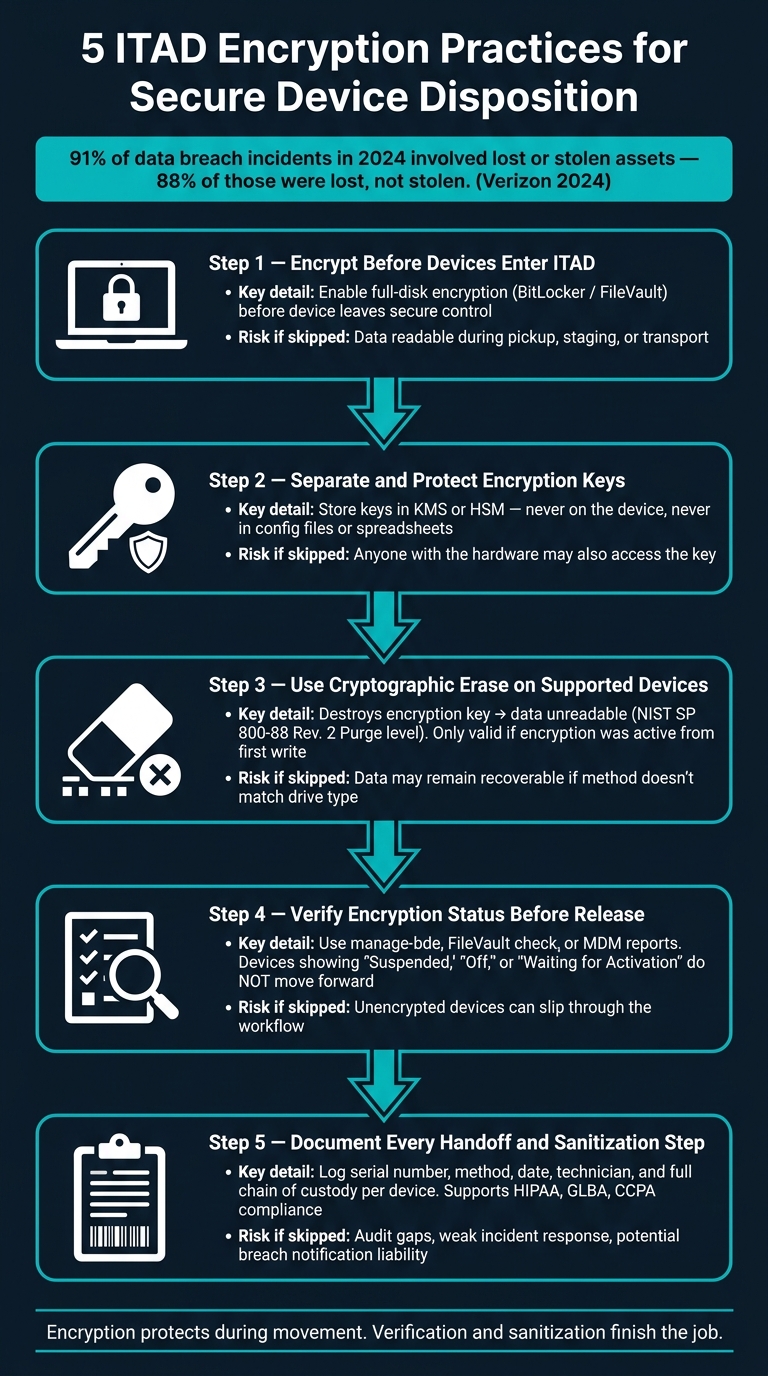
5 ITAD Encryption Practices: Secure Device Disposition Workflow
How ITAD Is Changing EVERYTHING in Tech 💥 (2026 ITAD Trends + Secrets)
Quick Comparison
Practice | What I’d focus on | Main risk if skipped |
|---|---|---|
Encrypt before ITAD | Turn on full-disk encryption before the asset leaves secure control | Data can be read during pickup, staging, or transport |
Separate keys | Keep recovery keys in KMS/HSM, not with the device | Anyone with the device may also get the key |
Use cryptographic erase | Destroy the key on supported encrypted media | Data may stay recoverable if the method does not fit the drive |
Verify status before release | Check actual encryption or sanitization state per device | A device may move forward even though protection is off or suspended |
Document handling and disposition | Log serial number, method, dates, technician, and custody trail | Audit gaps, weak proof, and poor incident response |
If I had to sum up the article in one line, it would be this: encryption helps during movement, but only verification and sanitization finish the job.
What Encryption Protects During ITAD
During ITAD, data is at risk any time a device changes hands. Encryption at rest keeps stored data unreadable from pickup through final disposition. The risk changes from one stage to the next, but the control does not.
At pickup, during transport, and in staging, encrypted devices stay unreadable even if they're lost, stolen, or briefly accessed by technicians. That still matters in staging areas, where insider threats or accidental access can happen.
For reuse and redeployment, though, encryption by itself isn't enough. Before a device goes to a new user or is donated, the data must be actively sanitized. Encryption protects data while the device is moving through the process. Cryptographic erase, wiping, and destruction handle final sanitization.
Method | Function | NIST Category | Reusable After? | Use Case |
|---|---|---|---|---|
Cryptographic Erase | Destroys the encryption key, making stored data permanently unreadable | Purge | Yes | SSDs, SEDs being resold or redeployed |
Physical Destruction | Shreds, crushes, or degausses the media beyond recovery | Destroy | No | High-sensitivity data, unverifiable encryption history |
That protection only holds up if the data is fully removed at end of life.
1. Encrypt Data Before Devices Enter the Disposition Workflow
Encrypt devices before they leave secure control. The stretch between decommissioning and pickup is one of the riskiest handoffs in ITAD. If a device isn't encrypted before it leaves your building, anyone who gets physical access during that window may also get data access.
Use full-disk encryption like BitLocker or FileVault. That step cuts breach exposure during ITAD in a big way.
But encryption alone isn't enough. Key storage matters just as much as encryption. Store recovery keys in a centralized KMS or HSM with role-based access. Put simply, encryption only does its job when every asset is confirmed active before it moves.
Before any device enters the ITAD workflow, verify its encryption status. Most endpoint management platforms can produce per-device reports that show:
the encryption algorithm
key management status
the last verification timestamp
It also helps to spot-check devices to make sure the data stays unreadable without credentials. Save logs or screenshots by asset ID for audit records.
Check compatibility before pickup too. Older systems, and some storage hardware, may not support active encryption. If the encryption status is unclear, hold the asset until key access is reviewed. After that verification step, the next control is keeping the keys separate and protected.
2. Separate and Protect Encryption Keys
Once encryption is verified, key control becomes the next line of defense.
Here’s the plain truth: encryption is only as strong as the gap between the data and the keys. If the key sits on the same device it protects, anyone who gets that hardware may be able to decrypt what’s inside. During ITAD, those keys need to stay separate while devices move through pickup, storage, and final disposition.
Keep keys in a dedicated system, such as a centralized key management system (KMS) or a hardware security module (HSM) for tamper-resistant key storage.[5][6] And don’t cut corners here. Never store keys in config files, spreadsheets, or help desk tickets, and never let recovery keys travel with the device.[8]
Access to keys should follow the principle of least privilege. IT security should manage the KMS. IT operations should have limited access. ITAD and logistics should handle only the hardware. That split matters because it limits who can touch key material during transit and processing.
There’s a clear payoff to key isolation. If a pallet of laptops goes missing or a shipment is sent to the wrong place, the devices stay unreadable without access to the KMS or HSM. At that point, revoke or retire the related keys and document the incident. In practice, keys should be revoked or retired as soon as a device is flagged for disposition.
Once keys are isolated, the next step is to use cryptographic erase on supported devices.
3. Use Cryptographic Erase for Supported Devices
With keys kept separate, the next move is to sanitize the data. For supported devices, cryptographic erase (CE) is a practical way to handle that.
On self-encrypting drives and many SSDs, cryptographic erase destroys the encryption key that makes stored data readable. Once that key is gone, the data left on the media can't be decrypted. Under NIST SP 800-88 Rev. 2, CE is a Purge-level sanitization method. That means data is considered infeasible to recover, even with laboratory-level forensic techniques.[9][12] For ITAD, it's the fastest purge option on supported hardware. But there's a catch: CE works only when the device's encryption history is known.
Use CE only if full-disk encryption was active for the device's entire service life.[10][12] If that can't be confirmed, or if encryption status is unclear, use another purge or destroy method instead, such as overwrite or physical destruction. CE also depends on verified hardware encryption, often AES-128 or AES-256 with FIPS 140-validated key handling.[12][13] Once a device meets those conditions, the last step is simple: run the erase and keep proof.
Use a manufacturer or NIST-aligned tool to erase the key. Then confirm the drive no longer exposes prior data, and save the results with the asset record.[11][4] For each device, record:
Serial number
Date
Operator
Tool used
The standard referenced, such as NIST SP 800-88 Rev. 2 Purge[11][14]
Regulators, clients, and auditors may ask for sanitization records for each device. Those records set up the next checkpoint: verifying encryption status before disposal or reuse.
4. Check Encryption Status Before Disposal or Reuse
Sanitization means nothing if no one checks it. Before any asset goes to reuse, resale, or destruction, confirm its status. This is the point where encryption stops being a policy on paper and becomes proof.
Don't treat policy as proof. A device may sit under an encryption policy and still not be encrypted. Repairs or OS reinstalls can leave a drive exposed, even when internal records say everything is fine. On Windows, use manage-bde -status or Get-BitLockerVolume. On macOS, check FileVault in System Settings or Terminal. For mobile devices, use MDM compliance reports. Any volume showing "Suspended", "Off", or "Waiting for Activation" is not ready for release.[15] Only assets that have been checked and confirmed should move ahead.
This status check should act as a release gate in the disposition workflow. If a device can't be confirmed as encrypted or sanitized, it does not move forward. It goes back for cryptographic erase, purge, or physical destruction.[2][7] That one checkpoint helps catch devices that slip through when someone assumes the work already happened.
Each verified device also needs a matching record. NIST SP 800-88 recommends that every sanitized item have a certificate of sanitization that includes the manufacturer, model, serial number, media type, sanitization method, date, and technician.[2] At this stage, record the asset ID, method, date, and technician. Those records serve as audit evidence. Carry that proof into the final disposition record.
5. Document Encrypted Asset Handling and Final Disposition
Once you've confirmed encryption status and dealt with the keys the right way, the next step is paperwork. Not glamorous, but this is where audits are won or lost.
Document each device one by one. Skip batch entries. And don't rely on generic certificates with no serial numbers; those often fail audit review. Every record should include the device's manufacturer, model, serial number, asset tag, encryption method used, sanitization method - whether that was cryptographic erase, overwrite, or physical destruction - the applicable standard, date and time, and the technician's name and ID.[1][18]
If you used cryptographic erase, say so plainly. The record should state that the encryption keys were destroyed and that the data remains unreadable.[3]
Just as important: track custody, not only sanitization. You need a chain of custody that shows every handoff from the moment the device leaves production through transport and final disposition. That includes who collected it, when it was collected, how it was packaged, and who received it at each step. If tamper-evident seals were used, log the seal details and seal numbers too.[16][17]
When devices go to a third-party ITAD provider or recycler, don't just ship and hope for the best. Reconcile signed manifests and device counts against the assets actually received before any processing begins.[16][21]
After processing, line up every final disposition record with the sanitization log and the chain of custody for that same asset. The details change based on what happened to the device:
Resold devices need sanitization confirmation, the sale date, and the resale channel.
Redeployed devices need the new user or department, plus confirmation that prior data was removed.
Destroyed devices need the destruction method, shred size, date, and processor certificate.[1][18]
In each case, the record should link back to the sanitization log and chain-of-custody entries for that specific device.
This kind of serialized recordkeeping can do more than tidy up your files. Under HIPAA, GLBA, and state privacy laws like the CCPA, device-level sanitization records may reduce or remove breach notification duties when a device was encrypted and properly sanitized.[19][20] That's why complete documentation matters so much in ITAD. It's the proof that the process happened the way you said it did.
Encryption at Rest vs. Cryptographic Erase vs. Physical Destruction: A Side-by-Side Look
Once the paperwork is done, put these three methods next to each other. That makes it much easier to choose the right path for each asset.
The table below compares each option by NIST category, main upside, tradeoff, and best-fit use case.
Method | NIST 800-88 Level | Benefit | Limitation | Best Use |
|---|---|---|---|---|
Encryption at Rest | N/A (security state, not sanitization) | Keeps data unreadable during active use, transit, and ITAD staging | Does not sanitize media; keys still exist and data remains recoverable | Devices in active use or being transported to an ITAD vendor before a purge or destroy step |
Cryptographic Erase | Purge | Extremely fast; destroys keys instead of wiping every data block; retains resale value | Only works if encryption was enabled from first write; requires verified key destruction | Encrypted SSDs, SEDs, and modern laptops headed for resale, redeployment, or reuse |
Physical Destruction | Destroy | Highest assurance; data is physically eliminated and unrecoverable | Eliminates resale value; generates e-waste requiring compliant recycling; costs more | Damaged or nonfunctional drives, highly sensitive or regulated data, or assets where encryption history can't be confirmed |
Here’s the simple version.
Encryption at rest protects data while a device is being used or moved. But it does not sanitize retired media. The data is still there.
Cryptographic erase is fast and helps preserve resale value. That said, it only works if encryption was turned on from the very first write and the key destruction can be verified.
If data risk matters more than resale value, physical destruction is the right move. And if destruction is on the table, use a certified provider so handling and recycling are done the right way.
Use this matrix one asset at a time in the device-by-device guide below.
Device-by-Device Disposition Guide
These defaults turn the earlier encryption rules into device-level disposition decisions. Use the table below to pick the default path based on device type.
Device Type | Primary Encryption Practice | Recommended Disposition | Cryptographic Erase (CE) | Physical Destruction | Verification Required |
|---|---|---|---|---|---|
SSD-based endpoints (laptops and desktops) | Full-disk encryption (BitLocker, FileVault) | CE for reuse or resale | Preferred when the SSD supports SED or NVMe crypto erase | If CE fails or encryption was never enabled | Erase tool logs |
HDD-based endpoints (laptops and desktops) | Full-disk encryption | Certified overwrite or degauss | Only if SED-equipped | Recommended when encryption can't be verified or data is highly sensitive | Wipe report with serial number |
Servers | Volume or database encryption (dm-crypt/LUKS, SED arrays) | CE + verification; destroy for regulated workloads | Recommended for NVMe/SSD arrays | Recommended for regulated or highly sensitive workloads | Mandatory audit trail + decommission ticket |
SSDs (standalone) | Hardware or OS-level encryption | CE strongly preferred | Primary method - overcomes wear-leveling issues | If CE is unsupported or firmware is locked | Random-sector read checks + tool report |
HDDs (standalone) | Full-disk encryption | Certified overwrite or degauss | Only if SED-equipped | Standard for damaged or high-sensitivity drives | Full read-back verification |
USB Drives / SD Cards / External Drives | BitLocker To Go, VeraCrypt, or hardware encryption | Shred by default; use CE only for hardware-encrypted media with verified vendor reset | Only for hardware-encrypted devices with vendor reset | Default for unmanaged or unencrypted media | Photo evidence of destruction |
Two categories need extra care.
Servers carry the most risk because they often store centralized databases, file shares, and regulated records. RAID setups, virtualized storage, and array-level designs can make it tough to prove that every data-bearing part was erased. If you can't verify every data-bearing component, default to destruction.
Removable media is easy to miss, and that makes it risky. A NAID-linked study found that 40% of used electronic devices sold on the secondary market still contained recoverable PII.[22] USB drives, SD cards, and external drives are easy to misplace and hard to check after an erase. Because of that, many organizations default to shredding all unmanaged removable media instead of trying to verify erasure.
For bulk destruction, chain-of-custody records and destruction certificates matter just as much as the wipe method. Send bulk shredding to a certified IT asset disposition provider that issues a certificate of destruction.
Conclusion
Retired devices can still hold recoverable data while they're being moved, stored, or sent for final disposition. Because of that, encryption needs to be built into a documented ITAD workflow from the start. Used devices often still contain recoverable data.
That’s why these five controls need to work together as one process: encrypt devices before pickup, keep encryption keys separate, use cryptographic erase on supported hardware, verify device status before release, and document each asset’s sanitization and chain of custody.
If your team needs local help putting that workflow into practice, Rica Recycling can assist with pickup, secure data destruction, and compliant electronics recycling.
Encryption, key control, verification, and documentation make ITAD defensible and auditable.
FAQs
When is cryptographic erase enough?
Cryptographic erase is enough when the goal is to securely sanitize sensitive data and still keep the device usable for reuse or resale. It works especially well for solid-state drives, where old-school overwriting can miss cells the system can’t reach.
That said, it only works if the encryption keys are verified destroyed. Once those keys are gone, the data becomes mathematically unrecoverable.
For highly confidential or classified data, or for hardware that’s physically damaged, NIST 800-88 recommends physical destruction instead.
What if a device’s encryption status is unknown?
If a device’s encryption status is unknown, go with the safest sanitization method. From a security and compliance standpoint, that usually means physical destruction.
If you can’t confirm that encryption is in place, or the device doesn’t use strong encryption, it’s safer to destroy the media than to guess.
If the device still needs to work after sanitization, use software-based overwriting (Clear) or certified erasure. If the device is damaged or no longer works, physical destruction - such as shredding - is the right move.
Why does chain of custody matter for ITAD?
A secure chain of custody matters in ITAD because it creates a clear, documented trail of accountability from the moment equipment leaves your site to final destruction.
That paper trail does a lot of heavy lifting. When you track serial numbers and record each handoff, you make it much harder for devices to go missing, get stolen, or slip through the cracks. You also lower data breach risk and make audit prep far less painful.
Without that trail, there’s a gap. Even if the data is destroyed, you may still be missing the records needed to show compliance with rules like HIPAA, GDPR, or NIST 800-88.