
Checklist for Hosting E-Waste Collection Events
A smooth e-waste event comes down to five things: plan early, post a clear accepted-items list, set up safe traffic flow, protect data, and keep records. If I were running one in California, I’d start 6–8 weeks ahead, confirm state and local rules, separate batteries, screens, and data devices, and make sure every pickup has a paper trail.
Here’s the short version of what matters most:
Set the scope first: volume target, staffing, budget, and backup funds of 10%–15%
Check California rules: some devices with screens over 4 inches must go through certified recycling channels
Choose the right recycler: ask about certifications, downstream handling, and data destruction records
Build the site for traffic and safety: one-way flow, clear signs, cones, bins, PPE, and a spill plan
Protect stored data: log laptops, phones, drives, servers, and other storage devices at intake
Track the day: counts, rejected items, incidents, manifests, and destruction records
Close out fast: clean the site, store records for at least 3 years, and review what slowed the event down
This article is a start-to-finish checklist for hosting an e-waste collection event without confusion, unsafe handling, or missing paperwork.
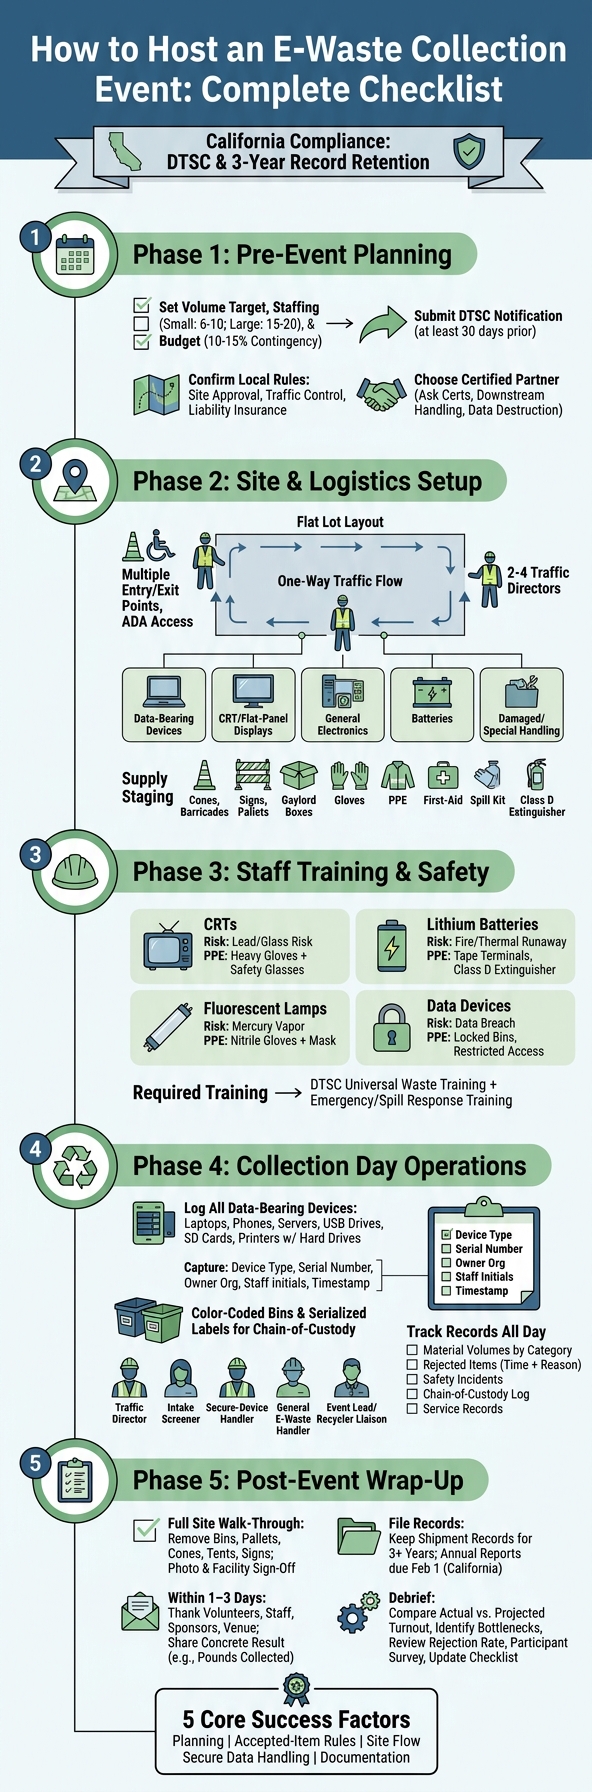
E-Waste Collection Event Checklist: 5 Phases from Planning to Wrap-Up
How to set up an outdoor e-waste collection event
Before setting up your event, it is helpful to research where to recycle your electronic waste to understand local options and requirements.
Pre-Event Planning Checklist
Start planning 6–8 weeks in advance. That gives you enough time to secure permits, book a recycling partner, set the budget, and get the word out. Since your accepted-items list is already set, this stage defines the event’s scope, compliance needs, and on-site logistics.
Set Goals, Budget, and Event Scope
Start with a clear volume target. That single number affects almost everything else: who can participate, which items you’ll take, and how much truck space you need. A small half-day event usually needs 6–10 staff, while larger events may need 15–20.
Your budget should cover signage, rentals, permits, hauling, recycling, and any fees for special items or data destruction. It also helps to add a 10–15% contingency line to your total estimate. Those figures shape staffing plans, truck capacity, and how much material your vendor can handle.
Confirm California and Local Requirements
In California, submit DTSC notification at least 30 days before the event and file the annual report afterward. [4][7]
Also check local rules for:
Site approval
Traffic control
Liability insurance that names the property owner as an additional insured
Advertising restrictions
Lithium-ion batteries and mercury lamps fall under universal-waste rules. That means you need to separate them by type and package them the way your recycler requires. [6][2] Put those rules anywhere attendees might look first, like registration pages, flyers, and event signage. Once you’ve nailed down local requirements, you can move into site setup and partner planning.
Choose a Certified Recycling and ITAD Partner
Your recycling partner can make or break the event, so be direct. Ask questions like: What certifications do you hold? Can you provide a written downstream processing policy? How do you document data destruction for laptops and servers?
For Bay Area events, Rica Recycling is a certified electronics recycling and ITAD provider that offers secure data destruction with certificates of destruction, appliance recycling, and IT asset recovery under a 100% landfill-free policy in full compliance with California e-waste regulations. [1] From there, you can lock in accepted materials, paperwork, and truck and bin placement.
Site, Logistics, and Safety Checklist
The next step is turning a parking lot into a safe, orderly drop-off site. A smart layout keeps cars moving, protects staff, and helps each item end up in the right container.
Choose a Site with Safe Traffic Flow
The best sites tend to have the same basics: a large, flat surface, more than one entry and exit point, room for two lanes of one-way traffic, and easy access for box trucks or roll-off containers. Avoid sites that force left turns across busy roads or have a single entry point. Those problems can jam things up fast. Map a one-way loop - entry, check-in, unloading, then exit - and walk or drive it before the event to make sure it holds up under pressure. [14]
ADA access matters too. Look for marked accessible parking near check-in, step-free paths, and clear signage for people with mobility or visual impairments. Pop-up canopies also help. They shield staff and electronics from sun, rain, and wind, and they can cut down on slip risks.
Go with flat lots, one-way circulation, ADA access, and secure loading space. Stay away from single-entry sites and unsafe turns. Once the route is mapped, place each station so vehicles never cross pedestrian or loading paths.
Set Up Stations, Signage, and Equipment
Assign 2–4 traffic directors in high-visibility vests to manage the line and keep vehicles from backing up onto public streets. [5][8] Put all collection pallets and bins outside vehicle lanes so staff never need to step across moving traffic to handle items. [5]
Set up separate, clearly marked stations for:
data-bearing devices
CRT and flat-panel displays
general electronics
batteries, if accepted
a "Damaged/Special Handling" area for broken or leaking items
Before the event starts, stage the core supplies: traffic cones, barricades, directional signs, tables, pallets, Gaylord boxes, hand trucks, dollies, shrink-wrap, labels, gloves, safety glasses, high-visibility vests, a first-aid kit, a spill kit, and a Class D or dry-sand fire extinguisher for battery incidents. [12] Working with a certified partner like Rica Recycling can help tighten your supply plan and confirm which pallets, Gaylords, labels, or specialty containers they’ll provide.
Train Staff and Volunteers on Safe Handling
Hold a safety briefing before the event opens. Cover four points: safe lifting (bend at the knees, team-lift CRT TVs and copiers, use dollies for heavy loads), traffic control (only designated marshals stand in vehicle lanes), PPE (gloves, safety glasses, high-visibility vests, and closed-toe shoes are required in active zones during the event), and emergency procedures (who to call, where the first-aid kit and fire extinguisher are, and where to direct participants if an evacuation is needed). [13]
Only trained, designated personnel should handle data-bearing devices. Keep that station away from public queues, use lockable bins or cages, and log every device received by type, count, and time. [12] Staff also need to know the four hazards most likely to show up on site.
Hazard Category | Risk | PPE Required | Handling Steps | Incident Response |
|---|---|---|---|---|
CRTs (Monitors/TVs) | Lead exposure; glass cuts | Heavy-duty gloves, safety glasses | Two-person lift; do not stack high; face screens inward on padded pallets | Isolate the area; package broken CRTs separately; log the incident [9] |
Lithium Batteries | Fire/thermal runaway | Gloves, safety glasses | Tape or bag terminals; store in dedicated non-conductive bin away from heat | Move to an isolation area; use Class D extinguisher or dry sand; call 911 if fire develops [9][10] |
Lamps/Fluorescent Bulbs | Mercury vapor | Nitrile gloves, mask | Handle by base; place in dedicated fiber tubes; never crush | Evacuate and ventilate the area; use proper cleanup materials, not a broom [9] |
Data-Bearing Devices | Data breach | None required | Log each item; place in locked bin; restrict station access | Document any missing or unsecured device; notify the event lead and ITAD partner immediately |
California's Local Conservation Corps programs require two required training topics for e-waste staff: DTSC Universal Waste Training and Emergency/Spill Response Training. [13] Have volunteers sign in, confirm the briefing, and note lifting limits. After that briefing, move into device separation and check-in controls.
Data Security and Collection-Day Operations Checklist
With the site ready and the team briefed, the next job is simple to say but easy to mess up: protect participant data without slowing down the event. This is the point where an event earns trust - or loses it. Businesses, schools, and other organizations are handing over work devices, so the process has to be tight.
Separate and Track Data-Bearing Devices
At intake, treat any device with storage as data-bearing. That includes laptops, desktops, servers, phones, tablets, printers with hard drives, network gear, USB drives, SD cards, and backup tapes. A short visual guide helps a lot here. Review it in a 10- to 15-minute briefing before the event so volunteers know what to look for. A simple rule works well: if the item stores data, settings, or user files, send it to the secure station.
Use color-coded bins or pallet labels so items go to the right place without guesswork. Keep data-bearing devices in their own stream. Then assign a unique identifier to each batch or asset, such as a barcode or serialized label. Log the device type, serial number, owner organization, staff initials, and timestamp. Every handoff should be recorded, and chain-of-custody records should follow each batch or asset from intake through pickup.
If an organization has audit requirements, confirm in advance that your ITAD partner uses NIST SP 800-88-aligned sanitization methods, including Clear, Purge, or Destroy. Also confirm that the partner will issue a certificate of data destruction that lists device identifiers, the method used, and the date.
Run a Smooth Check-In, Unloading, and Loading Process
After devices are sorted, keep intake simple: one greeting point and one unload team. Intake and unloading should stay separate. One volunteer handles the short intake conversation, while a second team deals with the physical items. Have drivers stay in their vehicles while staff unload. That cuts pedestrian-vehicle conflict and helps keep traffic moving. [15]
Clear roles make the whole day run better:
A traffic director manages vehicle flow.
An intake screener confirms accepted items and flags data-bearing devices.
A secure-device handler logs, labels, and moves those items straight to the controlled staging area.
A general e-waste handler manages monitors, keyboards, and small appliances.
A designated event lead or recycler liaison works with the truck crew and site manager on pallet use, overflow, and loading timing.
During loading, secure pallets should be shrink-wrapped and labeled separately from general e-waste. Before they go on the truck, the event lead and the recycler's crew should verify them together.
Record Volumes, Incidents, and Service Details
A designated data recorder should track counts by category all day long: computers, displays, mobile devices, peripherals, and data-bearing devices as their own line item. Rejected items should also be logged with the time, item description, and reason for rejection. Safety incidents and property damage need a separate incident log that notes contributing factors and any corrective action taken on the spot.
Record Type | Details to Capture | Why It Matters |
|---|---|---|
Material volumes | Counts or weights by category, such as computers, displays, and data-bearing devices | Supports environmental reporting, grant applications, and future event planning |
Rejected items | Time, item description, reason for rejection | Prevents non-accepted items from being mixed into accepted loads |
Safety incidents | What happened, contributing factors, corrective actions | Supports insurance, liability, and layout improvements |
Chain-of-custody log | Device type, serial number, owner organization, handoff timestamps, pallet IDs | Enables audit support and destruction verification |
Service records | Pickup manifest, certificate of data destruction, asset report | Required for compliance reporting by participating organizations |
These records make post-event reporting and follow-up much easier.
Once loading is done, use the log to issue final paperwork. For secure destruction or IT asset recovery, confirm which documents your partner will provide: a pickup manifest, a certificate of data destruction aligned with NIST 800-88, and a device-level asset report. Rica Recycling provides chain-of-custody documentation that organizations can use directly in compliance and sustainability reporting. Send the right certificates and reports to each participant after the event.
Post-Event Wrap-Up Checklist and Conclusion
Complete Cleanup, Reporting, and Follow-Up
After loading and paperwork are done, it’s time to shut down the site and archive the records. Once pickup ends, move straight into closeout.
Start with a full site walk-through. Check that every bin, pallet, cone, tent, and sign is gone. Clear out stray cables, broken glass, shrink wrap, and spills so lots and walkways are left clean. If you find anything hazardous, like cracked CRT glass or leaking batteries, handle it under your recycler’s safety rules. Don’t throw those items into general trash. Take photos of the site and get facility sign-off on the cleanup checklist. [16][17][18]
After cleanup, send follow-up notes and file the paperwork. Within 1–3 days, thank volunteers, staff, sponsors, and the venue contact. Include one concrete result, like pounds collected or vehicles processed. That small detail makes the message feel grounded.
Then pull together all event records. In California, shipment records that show the origin, quantity, and date of transferred e-waste must be kept for at least three years, and annual reports for e-waste handling activity are due by February 1 each year. [11][3][24] For data-bearing devices, store serialized certificates of data destruction and chain-of-custody records in a separate file so they’re easy to find during audits or compliance requests. [21][22][23][25]
Review Results and Plan for the Next Event
Next, look at what happened and tighten the process for the next event. Debrief right after closeout, while the details are still clear. Compare actual turnout and vehicles processed with your pre-event projections. Note where traffic backed up, which volunteer roles felt short-staffed, and how many non-accepted items showed up at intake. If contamination ran high, tighten the accepted-item wording in your marketing and add clearer not-accepted examples to entrance signs. [16][17][19]
Use the data you already gathered to review both landfill diversion and day-of performance. Look at average vehicle time, peak throughput, and rejection rate. Even a short survey at checkout can help you see whether participants felt the process was clear and safe. [16][17]
The best move is to turn each lesson into a checklist change. If a two-hour traffic spike overloaded the site, try staggered appointment slots or longer hours next time. If tracking data-bearing devices felt messy, add barcode scanning or standard intake forms to the checklist. Strong events tend to come back to the same five basics:
FAQs
What items should I refuse at an e-waste event?
State banned items up front. Do not accept household hazardous waste, loose batteries, lightbulbs, or bulky items like full-size appliances, including refrigerators, washers, dryers, ovens, and stoves.
Other items that are often turned away include:
Fans
Floor heaters
Smoke detectors
Vacuum cleaners
VHS tapes
Media discs
Plastic
Wood
Tires
Solar panels
Glass or cans
Ask participants to read the event guidelines before they arrive. That small step can save time, avoid mix-ups, and keep the line moving.
Do I need appointments for an e-waste collection event?
It depends on the organizer’s rules. Some public community drives allow walk-up participation. Others ask people to book ahead so the team can handle logistics, staffing, and item volume without chaos.
If you’re running the event, spell out your participation policy in plain English. For professional pickup of larger amounts of equipment, scheduling is required. Always check the event details or contact the organizers to confirm.
How do I handle business devices with sensitive data?
Before disposal, permanently remove all data to help maintain compliance and prevent breaches. Back up any files you still need first. Then use professional data-wiping software that follows standards such as NIST 800-88 or DoD 5220.22-M.
If the data is highly sensitive, or the hardware has reached end of life, physical destruction is the safest route. In that case, work with a certified recycler that can provide a Certificate of Destruction. Rica Recycling offers secure IT asset recovery and certified destruction services.