
How Federal Agencies Ensure Secure Data Destruction
Federal data destruction comes down to three steps: pick the right sanitization method, track every device, and keep proof. If an agency skips any one of those, data can stay on retired laptops, servers, SSDs, tapes, or phones.
Here’s the short version:
Agencies classify the data first and then choose Clear, Purge, or Destroy based on data type, media type, and whether the device stays in agency hands.
Media type changes the method. For example, overwriting can work for HDDs, but SSDs often need cryptographic erase or physical destruction. And degaussing does not work on SSDs.
Nothing moves without records. Agencies log serial numbers, asset tags, owners, locations, handoffs, and retention checks before sanitization starts.
Retention rules still apply. Data cannot be destroyed until NARA-approved retention periods, legal holds, FOIA needs, and backup checks are cleared.
Verification is part of the job. A wipe report, visual inspection, or sampling record must show the data is no longer recoverable.
Audit records must stay on file. The article notes GSA guidance calls for keeping sanitization records for 3 years under NARA GRS 3.1, item 020.
In simple terms: federal agencies do not just wipe devices and move on. They match the device to the right method, control each handoff, verify the result, and save the paperwork.
This article explains that workflow from start to finish in plain English, with the main rules, media-specific steps, and the records agencies need to keep.
Certificates of Destruction and Federal Government Contractors
Step 1: Classify the Data and Choose the Right Sanitization Method
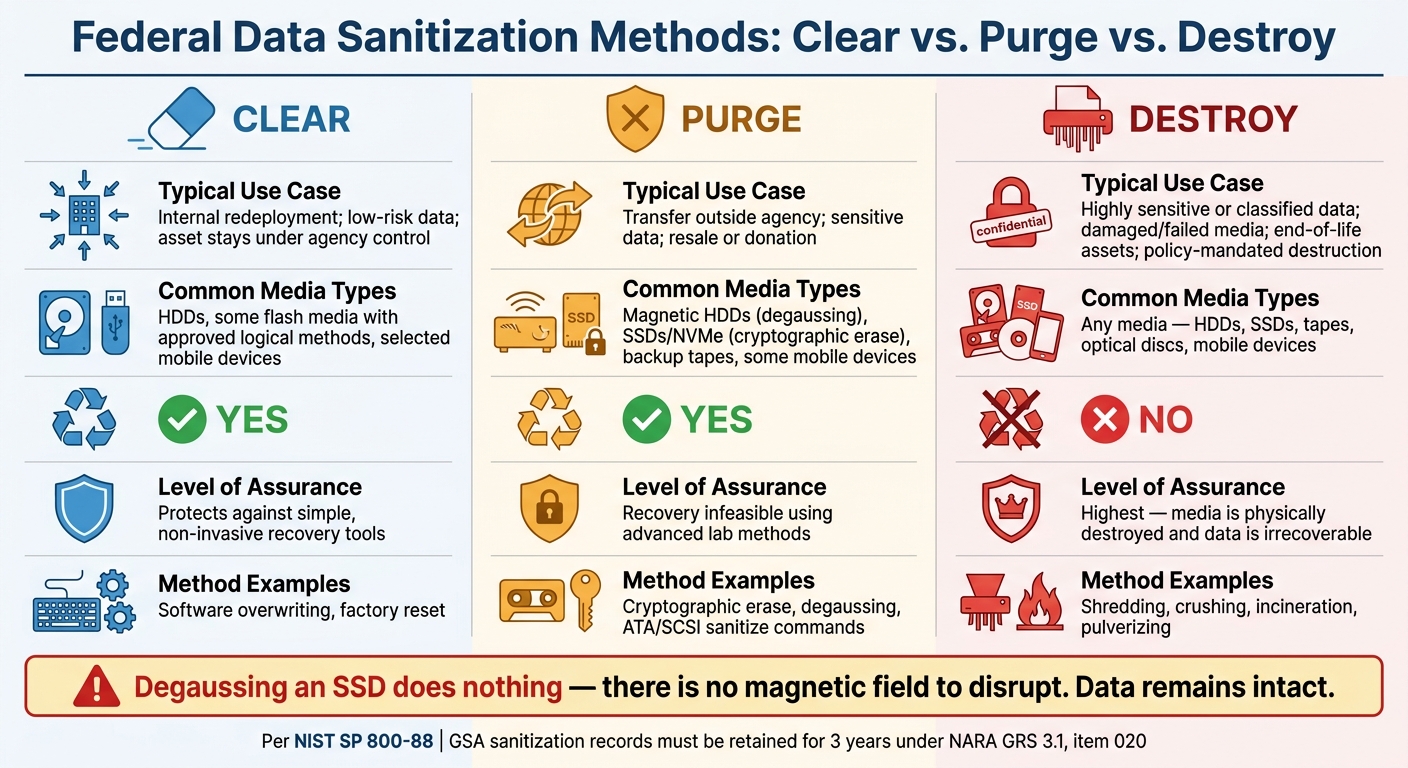
Federal Data Sanitization Methods: Clear vs. Purge vs. Destroy
Before any sanitization starts, agencies match each asset to the method that fits its data, media, and end state. That choice shapes every step that comes next.
How Agencies Choose Between Clear, Purge, and Destroy
Under NIST SP 800-88, the choice between clear, purge, and destroy comes down to three things: data sensitivity, media type, and whether the asset stays under agency control or leaves it.[2][4][9]
Clear uses logical methods, such as overwriting or a factory reset, across all accessible storage areas. It protects against simple, non-invasive recovery attempts. Agencies use it when a device stays under their control and the data risk is low.
Purge goes a step further. It uses physical or logical methods, such as cryptographic erase or degaussing, to make recovery infeasible even with advanced lab methods. Agencies turn to purge when a device will leave their direct control, like during surplus sales, transfers to other entities, or resale through an IT asset disposition partner.[2][1][4][9]
Destroy is the final option. It physically destroys the media through shredding, crushing, or incineration. Agencies reserve it for highly sensitive or classified data, damaged devices that cannot be sanitized with confidence, or cases where policy calls for maximum assurance and reuse is not allowed.[2][6][4]
The IRS gives a plain federal example. Pre-production media with Federal Tax Information (FTI) that stays in the same FTI role should be cleared. If it moves to a non-FTI function or leaves organizational control, it should be purged. If it will not be reused, it should be destroyed.[10]
Why Media Type Determines the Method
Media type matters because storage devices do not all behave the same way.
Magnetic hard drives (HDDs) store data on spinning platters, so both overwriting and degaussing work. A validated overwrite can meet clear-level needs, while degaussing with the right degausser can meet purge-level assurance.[1][7][8]
SSDs and NVMe drives are different. Wear leveling and over-provisioning can leave data behind even after an overwrite. That is why agencies rely on cryptographic erase for these devices by sanitizing the encryption key on a self-encrypting drive. If they cannot validate cryptographic erase, they move to physical destruction.[1][4][7][9]
Backup tapes are usually degaussed for purge or shredded and incinerated for destroy. Optical media, including CDs, DVDs, and Blu-ray discs, cannot be overwritten in a reliable way, so agencies go straight to physical destruction through shredding or pulverizing.[1][8] Mobile devices follow a similar pattern. A manufacturer-supported factory reset can support clear, while a manufacturer-supported erase or cryptographic erase can meet purge needs. Damaged devices, or devices that cannot be sanitized with confidence, are physically destroyed.[3]
One point is worth stating plainly: degaussing an SSD does nothing. There is no magnetic field to disrupt, so the data stays intact.[1][7]
Sanitization Method Comparison Table
NIST Category | Typical Use Case | Common Media Types | Reuse? | Level of Assurance |
|---|---|---|---|---|
Clear | Internal redeployment; low-risk data; asset stays under agency control | HDDs, some flash media with approved logical methods, selected mobile devices | Yes | Protects against simple, non-invasive recovery tools |
Purge | Transfer outside agency; sensitive data; resale or donation | Magnetic HDDs (degaussing), SSDs/NVMe (cryptographic erase), backup tapes, some mobile devices | Yes | Recovery infeasible using advanced lab methods |
Destroy | Highly sensitive or classified data; damaged/failed media; end-of-life assets; policy-mandated destruction | Any media type: HDDs, SSDs, tapes, optical discs, mobile devices | No | Highest; media is physically destroyed and data is irrecoverable |
Document the data class, media type, and disposition at this stage. That record feeds the chain-of-custody process. Once the method is chosen, the asset moves into the documented chain-of-custody workflow.
Step 2: Follow a Documented Chain-of-Custody Process
After you choose a sanitization method, the next job is simple in theory and easy to mess up in practice: keep control of every device from decommissioning to final disposition. A GAO review found that an effective federal media disposal process must include tracking and proper security for media, not just sanitization itself.[5] That means starting with inventory, confirming retention status, and locking down the staging area.
Inventory Every Data-Bearing Asset Before Disposal
Before any device moves, agencies create a full device-level inventory. For each asset, record the asset tag or barcode ID, serial number, device type, manufacturer and model, assigned owner or business unit, physical location, and the security classification of the data it handled. Store this list in a CMDB or asset management system, with each device linked to change records and disposal requests.
One step matters more than it might seem: match physical counts to system records before removal. If a device appears in the CMDB but can't be physically located, that's an uncontrolled data risk. To make this process less slow and less messy, agencies often use barcode scanners or RFID tags. That inventory then becomes the manifest for transfer and sanitization records.[15][16]
Check Records Retention and Backup Requirements
Once the manifest is done, confirm that the data can legally be removed. Sanitization can't start until the agency verifies that the data is not subject to retention rules. Federal agencies tie this review to National Archives and Records Administration (NARA) retention schedules and OMB memoranda M‑19‑21 and M‑23‑07, which require agencies to manage and transfer permanent records in approved electronic formats before disposing of media.[11][12][13][14]
Review NARA schedules, legal holds, FOIA requests, and investigations before approving disposal. If records must be kept, export or migrate them to approved storage, then verify the copy with checksums before sanitizing the device. Attach proof of those backup steps to the disposal record.
Secure Storage, Transfer Logs, and Access Controls
After records clearance, keep the device in a controlled staging area until sanitization. NIST SP 800-88 is explicit that media awaiting sanitization must be protected with proper physical and environmental safeguards to prevent unauthorized access or removal.[18] In plain English: don't let retired devices sit around in an open room. Store them in locked, access-controlled staging areas with logged access and surveillance. Put loose drives or tapes in sealed, tamper-evident containers. Place portable devices like laptops in locked cabinets.
Every handoff, whether it's between internal teams or to an outside vendor, needs a signed transfer record. Each log should include:
Date
Parties involved
Location
Serial numbers
Signatures
For vendor pickups, also record the transport method, container or pallet IDs, and any tamper-evident seals used. Serial-number-level records are the standard. Batch certificates by themselves aren't enough for federal audits.[16][17]
Step 3: Sanitize, Verify, and Record the Results
Once each asset has been inventoried, staged, and approved for disposal, the next job is simple in theory and serious in practice: sanitize it, verify it, and document it. At this point, the manifest becomes your control list for both sanitization and verification.
Execute Approved Sanitization Procedures
Use the method assigned in Step 1.
For Clear, run approved software-based overwriting tools with one or more passes. For Purge, use ATA/SCSI sanitize commands or cryptographic erase for SSDs and self-encrypting drives. If the media type allows it, you can also degauss magnetic media with approved equipment. For Destroy, physically make the media irrecoverable through data destruction - shredded, disintegrated, pulverized, incinerated, or crushed - based on the applicable NSA/CSS destruction standards for that media type.
As soon as the method is finished, move straight to verification. No gap, no guesswork.
Verify That Data Cannot Be Recovered
Sanitization without verification is incomplete. NIST recognizes both full verification and representative sampling. Sampling is often used for large batches when policy allows it and the residual risk is documented.
For software wipes, keep the report that shows the serial number, timestamps, method, and result. Technicians should then match the serial number against the Step 2 asset manifest to confirm the right device was processed.
For cryptographic erase, confirm that the key is gone and that sample devices no longer decrypt successfully. For physical destruction, a security officer or cleared staff member should perform a visual inspection to confirm the media meets the required destruction standard.
If verification fails, reprocess the device with a stronger approved method. If there’s still doubt, destroy it. Every failure also needs its own incident record with:
Asset ID
Error codes
Operator
Timestamp
Corrective action taken
Then attach the results to the asset record and keep them for audit use.
Keep Certificates and Audit Records
Every sanitized device needs an audit-ready record. GSA guidance says completed sanitization documentation must be kept for three years under NARA General Records Schedule 3.1, item 020.
At a minimum, each record should include the following:
Documentation Element | What to Include |
|---|---|
Asset identifiers | Serial number, asset tag, model, manufacturer |
Media type | HDD, SSD, tape, mobile device, optical disc |
Data classification | Pre-sanitization sensitivity level |
Sanitization method | Clear, Purge, or Destroy |
Technique and tool | Software name/version, degausser model/calibration date, shredder specs |
Operator and verifier | Name or employee ID of technician and reviewing official |
Date and time | Local U.S. date/time |
Verification results | Pass/fail, sampling method, any anomalies |
Final disposition | Recycled, transferred, destroyed, with destination noted |
The final output should be a signed Certificate of Sanitization or Destruction stating that the device was processed in accordance with NIST SP 800-88 Rev. 2 or the applicable agency policy. In practice, per-device certificates tied to exact serial numbers work best, because each record connects back to the original asset entry.
Conclusion: Applying Federal Best Practices to Secure IT Disposal
Federal disposal uses a clear sanitization method based on the asset, the media, and the data involved. After that method is picked, the next step is simple: document it well enough to show it was done the right way.
What makes disposal audit-ready is the paper trail. That includes inventory logs, verification records, and signed destruction certificates.
This isn't just a federal checklist. It maps neatly to day-to-day disposal work for Bay Area organizations that handle sensitive data. Log every asset, use the right sanitization method, record each handoff, and keep the proof.
For Bay Area organizations, Rica Recycling puts these controls into practice through secure data destruction and serialized documentation. Rica Recycling provides secure data destruction, IT asset recovery, and serialized certificates of destruction under a 100% landfill-free policy.
FAQs
When should an agency choose purge over clear?
An agency should choose Purge instead of Clear for sensitive or regulated data, especially when a device will leave the organization’s control or the data needs protection against advanced forensic recovery.
Clear is usually enough for non-sensitive data that stays inside the organization. Purge goes further. It uses stronger methods, such as cryptographic erasure or degaussing, to make data mathematically unrecoverable while still keeping the media functional for reuse or resale.
Why can’t SSDs be sanitized like HDDs?
SSDs can’t be sanitized the same way as HDDs. The reason is pretty simple: they store data electronically, not magnetically.
So methods like degaussing - which can work on old-school hard drives - don’t do anything useful on an SSD.
There’s another wrinkle too. SSDs use wear-leveling, which spreads data across different memory cells to help the drive last longer. Sounds smart, but it creates a problem for data removal. Some data can stay behind in cells that the system can’t easily reach, which makes overwriting less dependable.
Because of that, methods like secure erase or cryptographic erasure are often used instead. And with older SSDs, physical destruction may still be the safer option.
What records prove data destruction was done correctly?
The main proof is a tamper-resistant Certificate of Destruction. It shows the device serial number, the sanitization or destruction method, the completion date and time, and confirmation that the process worked.
Agencies also keep:
A chain-of-custody log
Personnel records
Verification results, such as sanitization logs or testing reports
For physical destruction, photographic evidence