
Checklist for Secure Data Disposal
Deleting a file does not remove the data. In many cases, the data stays on the device until it is overwritten, erased with an approved method, or the media is destroyed.
If I were handling old laptops, servers, phones, USB drives, backup tapes, or copier hard drives, I’d keep this checklist simple:
Check retention rules first
Stop if there is a legal hold, audit, or investigation
Inventory every data-bearing device and storage location
Match the disposal method to the media type and data sensitivity
Verify erasure results for each asset
Physically destroy failed or high-risk media
Track chain of custody from start to finish
Save serial-level records, erasure reports, and destruction certificates
This matters because sensitive data can show up in more places than most teams expect: local drives, backups, synced folders, cloud exports, printer storage, and cached files. And once a device leaves your control for repair, resale, donation, or recycling, the risk goes up.
A few points stand out right away:
HDDs, SSDs, flash media, phones, and tapes do not all need the same disposal method
SSDs and flash storage need extra care because wear-leveling can leave data behind
Batch-only certificates are not enough if you need item-level proof
Per-asset logs with serial numbers, timestamps, seal IDs, and pass/fail results make audits much easier
Here’s the short version: first confirm you’re allowed to destroy the data, then sanitize or destroy the media the right way, and finally keep records that prove what happened.
That is the whole goal of this checklist.
CompTIA A+ 1202 Data Destruction & Disposal Methods Rapid Review (Obj 2.9)
Governance and Compliance Checklist
This section turns retention and hold decisions into an approved disposal workflow.
Confirm Retention Periods and Legal Hold Status
Start by making sure the data can be destroyed. Check two things, in this order.
First, verify the retention period. Open your organization’s retention schedule and confirm the record category for the data on each device. Then make sure the required retention time has fully expired. For example, financial records may need to be kept for seven years before destruction.
Second, check legal hold status. Work with your legal team’s hold registry or case management system to confirm that no active litigation hold, regulatory investigation, or audit hold applies to the data, the related accounts, or the systems the data came from. If anything is unclear, stop. Don’t move ahead until legal counsel confirms in writing that disposal is safe and the hold has been released.
If either retention rules or hold status blocks destruction, the process ends here.
Before anything moves forward, document both checks in a disposal request form or ticketing system. Record:
the retention category
the scheduled destruction date
the legal hold result
the approver’s name
Match Data Sensitivity to the Right Disposal Method
The disposal method should match both the data classification and what will happen to the device next. The goal is simple: use the least aggressive method that still makes recovery impossible.
NIST SP 800-88 is the standard framework here. It groups disposal into three methods:
Method | What It Does | When to Use It |
|---|---|---|
Clear | Approved overwrite or reset | Low-risk data; in-house reuse |
Purge | Cryptographic erasure or validated sanitization | Sensitive or regulated data; reuse or resale |
Destroy | Shred or pulverize | Highly sensitive or failed media |
Internal project data may fit purge. But a server that held protected health information (PHI) under HIPAA, or media containing authentication credentials or encryption keys, should go straight to physical destruction.
SSD and other flash media need extra care. Because of wear-leveling, logical overwriting can leave residual data behind. So if those drives held Confidential or Restricted data and are leaving your control, they often go straight to physical destruction.
A disposal matrix by data class and media type helps keep these choices consistent.
Assign Approvals, Chain of Custody, and Recordkeeping Rules
Governance falls apart when ownership is fuzzy. Each step needs a clear person or team behind it. In most cases, the data owner requests disposal, records or compliance checks retention, legal clears holds, and IT security carries out the method.
High-risk or large-scale disposals should require senior approval.
From device removal through final disposal, chain of custody must stay documented the whole way. Log each asset by serial number and asset tag. Record every handoff with the date, time, location, and the name of the person or team taking custody. Keep assets in locked containers or secured staging areas while they wait.
Use serial-level evidence, not batch certificates.
That means recordkeeping should be itemized. For each asset, record the manufacturer, model, serial number, asset tag, media type, data class, method used, and completion date. Store those records in a central, access-controlled repository so auditors can find them fast.
Once approvals and custody rules are in place, move to sanitization or destruction.
Digital Data Sanitization Checklist
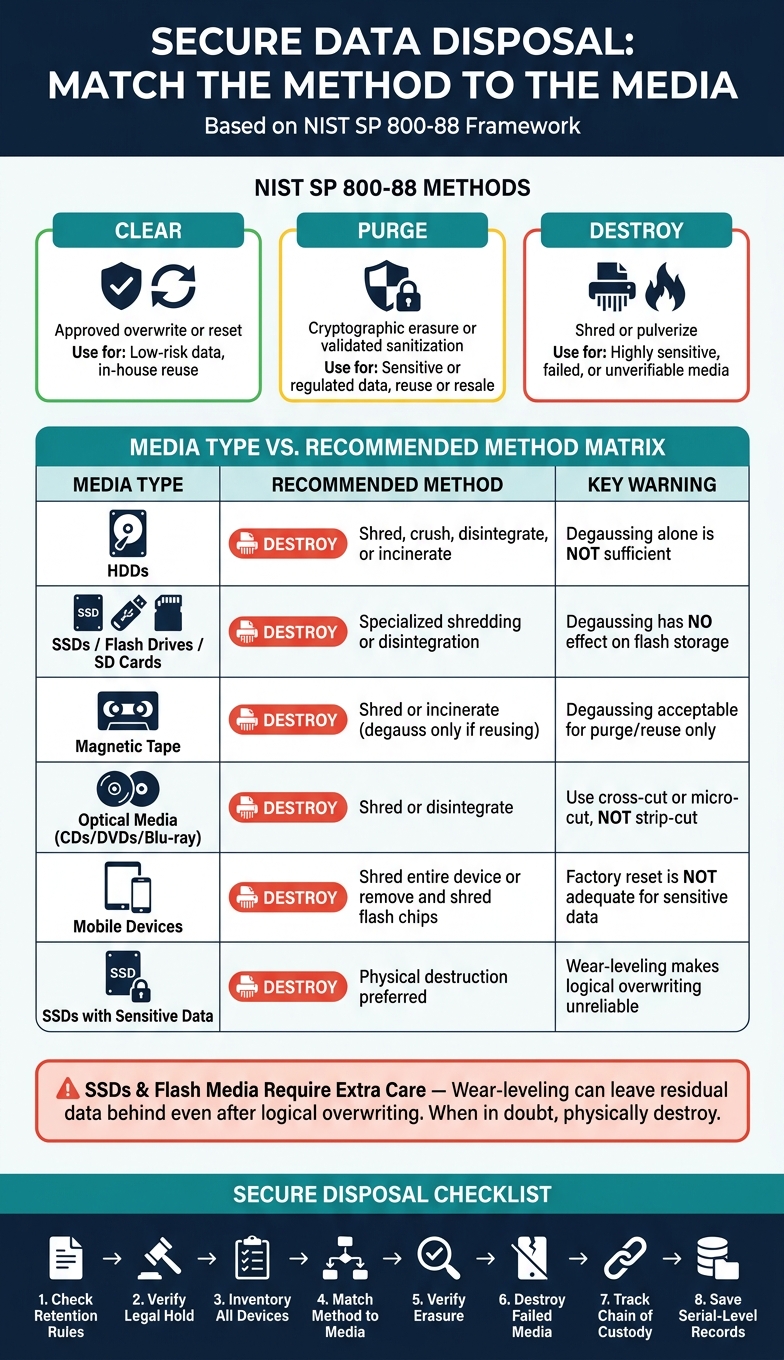
Data Disposal Methods by Media Type: NIST SP 800-88 Guide
Once governance sign-off and chain-of-custody rules are set, the next step is the hands-on sanitization work. This is where disposal projects often go off the rails. A team misses a device, picks the wrong method for the media, and suddenly the whole process has a gap.
Inventory Every Device and Storage Location
Before you erase anything, inventory every asset that can store data. Missed devices are a common reason disposal efforts fail. Missed locations cause the same problem.
Inventory these categories:
Device Category | Examples | Why It's Missed |
|---|---|---|
Endpoints | Laptops, desktops, workstations | Remote employees, storage closets |
Servers & Storage | Rack servers, NAS/SAN, backup tapes | Assumed to be wiped by IT already |
Portable Media | USB drives, SD cards, external HDDs | Stored in desk drawers or offsite boxes |
Mobile Devices | Phones, tablets | MDM-enrolled but not formally decommissioned |
Printers & MFPs | Multifunction printers, copiers, scanners | Internal hard drives rarely acknowledged |
Network Gear | Routers, firewalls, switches | Configuration files, cached credentials |
Cloud and Virtual | Snapshots, VM images, SaaS exports, backups | Active instance deleted but replicas remain |
For each asset, record the serial number, asset tag, storage type, data class, and storage location. That record drives every decision that comes next.
After the inventory is done, sanitize only the assets that have been cleared for disposal.
Use Approved Erasure Methods and Verify Results
Pick the sanitization method before the work begins. For assets already approved for disposal, the method needs to match the media type and the data classification confirmed during the governance step.
For HDDs, use a validated overwrite tool. [4][6] For SSDs and flash-based media, old-school overwriting can't be trusted because of wear-leveling and controller remapping. Use device sanitize commands, block erase, or cryptographic erase instead. [2][3][5][6]
Verification is not optional. You need to confirm that no readable user data remains. If you're using cryptographic erase, verify that the encryption keys were destroyed or made inaccessible. Record the tool name and version, operator name, date and time, method used, and the final pass/fail result for every single asset, not just a batch summary.
Route Failed Media to Physical Destruction
Any failed, damaged, unsupported, or unverifiable media should go straight to physical destruction. The same goes for SSDs or flash media that stored sensitive or regulated data and can't be verified with confidence.
Document the reason for failure, escalate if the device held regulated data, and keep the asset in a locked, secured container until destruction is confirmed. Then move those assets to the physical destruction checklist.
Physical Destruction and Recycling Checklist
Use this checklist for media that failed sanitization, can't be verified, or was approved for destruction from the start.
Choose the Right Destruction Method for Each Media Type
Not every device should be destroyed the same way. The method needs to fit the storage tech. If it doesn't, some data may still be recoverable.
Media Type | Recommended Destruction Method | Key Notes |
|---|---|---|
HDDs | Shred, crush, disintegrate, or incinerate | Platters must be physically damaged; degaussing alone is not sufficient [1][9] |
SSDs / Flash drives / SD cards | Specialized shredding or disintegration | |
Magnetic tape | Shred or incinerate | Degaussing may be used for purge if reuse is intended [7][9] |
Optical media (CDs, DVDs, Blu-ray) | Shred or disintegrate | Cross-cut or micro-cut shredders are more secure than strip-cut [7][9] |
Mobile devices | Shred the entire device or remove and shred internal flash chips | A factory reset is not adequate for high-sensitivity data [9] |
For SSDs and other flash-based media, physical destruction is the safer path when sanitization can't be verified.
Maintain Chain of Custody Until Destruction Is Complete
Keep chain of custody active until destruction is confirmed and recorded. Every handoff matters.
Secure collection: Place devices in locked, labeled bins as soon as they're flagged. Don't mix active devices with disposal batches.
Tamper-evident sealing: Seal each bin with a numbered tamper-evident seal. Log that seal number with the asset IDs inside.
Internal handoff: Record the date, time, location, person releasing custody, and person accepting it for every transfer.
Locked transport: For offsite destruction, document departure time, arrival time, and any stops.
Supervised destruction: Have an authorized representative present - in person or through video verification - when containers are opened. Check that every seal number matches the chain-of-custody log before destruction starts.
For each destruction session, the log should capture date, location, operator, batch ID, media type/count, method, equipment, seal numbers, and anomalies. [10][12][14] If a seal is broken without warning or a count doesn't match, treat it like an incident. Document it, escalate if regulated data is involved, and pause the process until it's resolved.
Send Destroyed Electronics to a Compliant Recycler
After destruction, send fragments into documented recycling channels. Destroyed material should go to certified recycling, not the regular trash.
Look for a recycler that clearly complies with California e-waste rules, keeps a clear downstream tracking process, and can provide a certificate showing how materials were handled. Certifications like R2v3 and e-Stewards show that a recycler follows documented standards for data security and environmental performance. [10][12][13] The EPA also notes that certified electronics recyclers should require destruction of all data on equipment they receive. [11]
Send destroyed material to a compliant recycler that provides downstream tracking and a destruction certificate.
Save the recycler receipt and destruction certificate for the documentation checklist.
Documentation and Final Review Checklist
Save Certificates, Erasure Reports, and Disposal Logs
Once destruction is done, close out the project file before the asset leaves your control. Every disposal project should end with one device-level file that can stand up to an audit or incident review.
At a minimum, each project file should include:
Serialized asset inventory: device type, manufacturer, model, serial number, and asset tag
Data classification: the sensitivity level of each asset and why the chosen method matched it
Sanitization or destruction details: method used (NIST 800-88 Clear, Purge, or Destroy), tool name and version, number of passes if needed, verification result, and escalation notes if a device was sent to physical destruction
Chain-of-custody forms: signed transfers with timestamps and time zone, tamper-evident seal IDs, and condition notes at each handoff [17][18]
Operator and approver information: the names or IDs of the technicians who performed sanitization, supervisors who checked results, and managers who approved disposal
Certificates of destruction and recycling: tied to the serialized asset list, not just a batch summary - batch certificates without serial-level linkage do not satisfy audit expectations [16]
Exception log: any missing devices, broken labels, or split handling decisions, plus how each issue was resolved [15][18]
Use a per-asset certificate linked to the serialized inventory.
Store all records in one access-controlled system tied to a unique project ID. That way, if an auditor shows up or an incident needs review, you can pull the file without a scramble. Keep chain-of-custody logs and certificates for the retention period required by policy, contract, or regulation.
If Rica Recycling handled destruction and recycling, file its certificate with the asset manifest.
Review the Process and Train Staff Regularly
The project file is more than paperwork. It’s how you check completeness, accuracy, and staff performance. Review records on a fixed cadence:
Annual or semiannual: review a sample of disposal logs, certificates, and chain-of-custody records for completeness and accuracy
Quarterly spot checks: focus on recent projects or high-risk assets - servers, removable media, and devices from departments handling regulated data - to confirm erasure reports are present and certificates match inventory
Post-project: after any large-scale decommission, run a review to document what caused delays and what should change next time
Training should match each role. IT staff need to know how to perform and verify sanitization, and when to escalate a failed drive to physical destruction. Facilities staff should understand secure storage, locked containers, and vendor handoffs. Compliance and records staff should focus on retention schedules, legal holds, and checking that logs and certificates match policy.
Short annual refreshers - 10 to 15 minutes - are easier to finish than long sessions. They also keep awareness current without slowing down day-to-day work.
Key Points to Carry Into Every Disposal Project
A disposal project ends when the file is complete, reviewed, and easy to retrieve.
FAQs
How do I know if data can be destroyed yet?
You can’t assume data is safe to discard just because files were deleted. A device is only safe to retire after it has been permanently sanitized or physically destroyed so the data can’t be recovered.
Use an approved method that aligns with NIST SP 800-88. Then verify the result. That second step matters. If there’s no proof the process worked, you’re guessing.
Your records should include:
The inventory ID or serial number
The method used
Who performed the work
When it happened
Proof, such as a Certificate of Destruction and verification logs
That way, if anyone asks what happened to a given device, you have a clear paper trail instead of a shrug.
Why isn't deleting files enough?
Deleting files or formatting drives usually doesn't remove the data itself. In most cases, the system just marks that space as open for new data. Until that space gets overwritten, specialized software can often recover the information.
If you need the data to be unrecoverable, use verified sanitization methods such as NIST 800-88 compliant wiping, degaussing, or physical destruction.
Which devices need physical destruction rather than erasure?
Physical destruction makes sense when a device is damaged and can't be wiped, or when it holds highly sensitive or classified data and you need the highest level of security.
This is standard for mechanical hard drives with low resale value. It also makes sense for older SSDs affected by wear-leveling, older mobile devices without strong encryption, and any device that will leave your control while still holding sensitive data.