
Secure Data Center Decommissioning with Reverse Logistics
_A bad data center shutdown can cost a company about _$4.88 million_ if discarded equipment leads to a data breach._* If I need to decommission a data center the right way, I focus on four things: inventory first, data destruction before removal, tracked transport, and documented final disposition.
Here’s the short version:
- I list every asset before anything moves, down to serial numbers, drive counts, tapes, and rack photos.
- I verify backups before shutdown and make sure wipes, key destruction, or physical destruction match each device type.
- I track every handoff from de-racking to transport to final intake so there are no custody gaps.
- I sort equipment by outcome: reuse, resale, parts recovery, or certified recycling.
- I close the project with records like destruction certificates, recycling records, and inventory reconciliation.
A few points stand out:
- Most projects take 8 to 12 weeks
- LTO-9 tapes should be physically destroyed or overwritten with certification, not degaussed
- High-risk assets often need onsite witnessed destruction or sealed, GPS-tracked transport
- Reuse paths can push asset recovery rates above 90% in some programs
| Step | What I focus on | Main risk if skipped |
|---|---|---|
| Plan | Inventory, backups, ownership, compliance rules | Missing assets and poor audit trail |
| Sanitize | Wiping, shredding, key destruction, VM snapshot cleanup | Data exposure |
| Move | Sealed packing, tracked transport, intake reconciliation | Custody gaps in transit |
| Close out | Reuse or recycling records, destruction docs, final matchback | Audit and reporting issues |
If I had to sum it up in one line: secure decommissioning is less about removing hardware and more about proving, step by step, what happened to every asset.
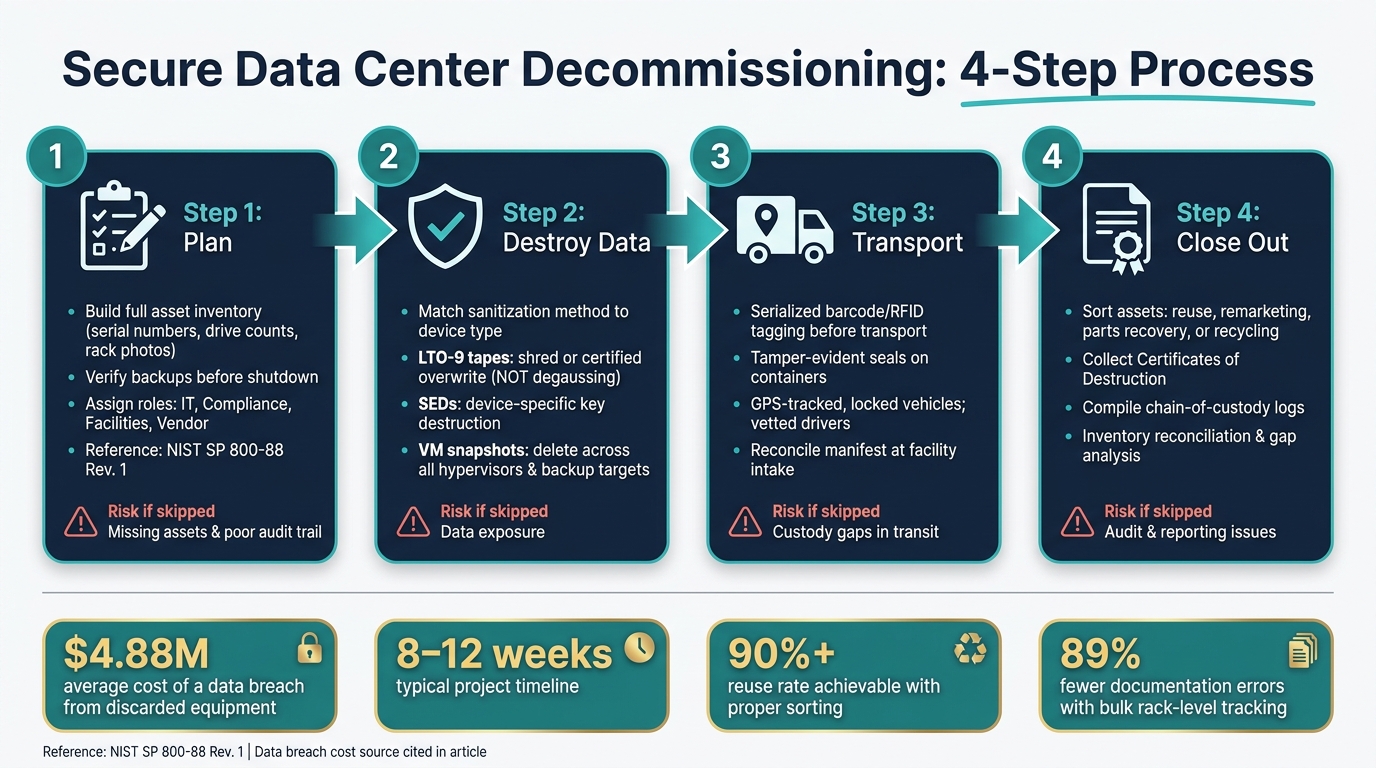
Data Center Decommissioning: 4-Step Secure Process
Inside The Secret World of Data Center Decommissioning!
sbb-itb-855056e
Step 1: Plan the decommissioning project before any equipment moves
Most decommissioning projects take 8 to 12 weeks. That’s enough time to get organized, but not enough time to wing it. Before anyone unplugs a single server, map out the privacy, e-waste, and sanitization rules that apply to the job. Start with the rack map, then use that same map to track each handoff from start to finish.
Build a full asset inventory and chain-of-custody list
Begin with a rack elevation diagram for every cabinet. Show each U slot, asset type, vendor, model, and serial number. That gives you a clean way to verify each item at every handoff.
For every asset, record the chassis serial number, motherboard serial, asset tag, drive count, and final disposition: reuse, remarketing, parts recovery, or recycling. Backup media needs its own record. LTO-9 tapes require physical destruction or certified overwrite, not degaussing. And don’t skip photos. Take front and rear pictures of every rack before disconnection, because written notes often miss cable routing details that come back to haunt reconciliation later.
| Inventory Component | Data to Record | Documentation Method |
|---|---|---|
| Servers/Storage | Serial (Chassis/MB), Asset Tag, Drive Count | Rack Elevation Diagram |
| Networking Gear | IP Addresses, Port Maps, VLAN Configs | Endpoint Mapping |
| Backup Media | Tape Format (e.g., LTO-9), Serial, Location | Media Map by Bay |
| Cabling | Connection Endpoints (Power/Data) | Photography & Labeling |
| Power/Cooling | PDU/UPS Load, Battery Condition | Utility Review |
Once the asset list is locked, confirm backups and the sanitization sequence before shutdown.
Set data migration, backup, and shutdown checkpoints
Identify self-encrypting drives (SEDs) and VM snapshot locations before shutdown starts. That part matters more than people think. VM snapshots can hold memory dumps that survive a standard VM deletion, so they need to be removed from all backup targets too.
The order here is firm: validate backups first, complete data wipes second, then power down and remove equipment. No drive should leave the site until backup verification is documented and signed off.
After that sequence is set, give each stage a clear owner.
Assign roles, timelines, and compliance requirements
Four roles should be defined in writing before the work begins:
| Role | Primary Responsibility |
|---|---|
| IT Team | Inventory ownership, workload migrations, and access requests |
| Compliance | Turning requirements into procedures and signing off on certificates |
| Facilities | Managing escorts, power-downs, and physical safety |
| Vendor Partner | Executing wipes, managing custody, and producing final reports |
The compliance section should directly reference NIST SP 800-88 Rev. 1 for media sanitization planning, along with any e-waste rules that apply. Ownership for data security, custody, transport, and final disposition needs to be assigned before any equipment moves.
Step 2: Destroy data securely and maintain chain of custody
Once inventory and roles are locked in, sanitize each asset before anything leaves the facility. In plain terms, pick the right destruction method for each device, document every handoff, and decide early whether the work will happen onsite or at a certified facility.
Choose the right sanitization method for each device
Use the master inventory to assign a sanitization method to each asset before removal. The method should match both the data sensitivity and the planned asset disposition.
For network devices like switches and routers, logical sanitization helps preserve the hardware for reuse or remarketing. LTO-9 tapes use barium ferrite coatings, which resist magnetic degaussing, so they need shredding or certified overwrite. VM snapshots and memory dumps also need attention, with deletion verified across hypervisors and backup targets. And self-encrypting drives need device-specific key destruction protocols, since standard wiping tools may miss them.
Before project closeout, match each destruction record back to the master inventory. Pre-migration workflows that identify self-encrypting drives before removal can cut down on missed sanitization steps.
After sanitization, every asset should move into a documented handoff process.
Document every handoff from removal to final processing
Tag each asset with a barcode or RFID tied to its ticket ID, then reconcile that record before transport. Every handoff matters. It closes the gap between removal and verified destruction.
On large projects, bulk rack-level inventory procedures cut documentation errors by 89% compared to individual asset tracking. Some teams also use pallet-level records for high-volume moves, with certificates issued after completion.
That chain of records then guides the next call: onsite or offsite destruction.
Decide when onsite or offsite destruction is the right choice
Use the custody record and data sensitivity level to decide where destruction should happen. The choice comes down to oversight, risk, and what happens to the asset next.
Onsite destruction fits cases where data classification is high or the security team needs to witness the process in real time. Direct staff oversight helps confirm that every serialized asset was processed.
Offsite destruction through a certified ITAD provider makes sense for assets moving into a recovery or recycling workflow, where data security and value recovery both matter. A certified ITAD provider can provide serialized certificates of destruction and full audit records. Either way, every device on the asset list should have a matching destruction record before the project closes.
| Factor | Onsite Destruction | Offsite Destruction |
|---|---|---|
| Oversight | Direct; staff can witness the process | Indirect; relies on serialized records and video evidence |
| Best for | High-sensitivity data requiring real-time staff oversight | Assets entering certified recovery or recycling workflows |
Step 3: Build a reverse logistics process for transport and disposition
Once sanitization is done and each asset matches the manifest, reverse logistics starts. This is the part where good prep can still fall apart if the handoff process is sloppy. From de-racking through facility intake, every move needs tight control.
Map the reverse logistics workflow from de-racking to facility intake
The workflow is pretty straightforward: de-rack, stage, pack, transport, and intake. But simple doesn't mean casual.
Start by de-racking from the top down. That keeps the rack stable and helps avoid tipping. As each asset comes off the rack, tag it and serialize it before it goes anywhere else. Then match those IDs back to the master manifest.
Next, move the assets into a secure staging area. That area should be access-controlled and covered by video documentation. After that, pack everything with protective padding and tamper-evident seals.
| Phase | Action | Security Control |
|---|---|---|
| De-racking | Systematic removal and cable harvesting | Serialized tagging and ticket reconciliation |
| Staging | Organizing in a secure onsite zone | Access-controlled area; video documentation |
| Packing | Protective padding and palletizing | Tamper-evident seals on containers |
| Transport | Physical movement to processing facility | GPS tracking; vetted drivers; direct routing |
| Intake | Scanning and triage at facility | Immediate reconciliation against master manifest |
One thing matters here: don't let equipment sit around unsecured. Move assets from de-racking to sealed transport as fast as you can.
Once assets are sealed and logged, the focus shifts to transit. The chain of custody can't get weaker just because the truck pulled away.
Use transport controls that match asset sensitivity
Not every project needs the same transport setup. But if the hardware holds data, a basic freight pickup usually isn't enough.
For high-sensitivity assets, use locked or sealed vehicles, real-time GPS tracking, vetted drivers, and two-driver teams so the vehicle is never left unattended. That's the difference between moving equipment and moving it with control.
| Feature | Basic Scheduled Pickup | GPS-Tracked Sealed Transport |
|---|---|---|
| Security | Standard freight handling; multiple stops | Locked/sealed vehicles; direct routing |
| Cost Exposure | Lower upfront cost; higher risk of loss | Higher service fee; protects asset resale value |
| Audit Readiness | Basic bill of lading | Real-time GPS logs; serialized chain of custody |
| Personnel | Standard driver | Vetted, background-checked drivers |
The goal is simple: keep custody unbroken from rack removal to facility intake.
Sort assets for reuse, remarketing, parts recovery, or recycling
Once the assets arrive, sort them right away. Letting gear sit in temporary storage slows everything down and can blur accountability.
In many cases, newer servers, memory, SSDs, and networking gear hold the strongest resale value. Wipe-to-resell programs can exceed 90% reuse, and storage and server platforms can recover major resale value.
Obsolete or damaged equipment should go to certified recycling instead. Here's how the main disposition paths compare:
| Factor | Reuse / Remarketing | Direct Recycling |
|---|---|---|
| Financial Return | High; recovers Fair Market Value (FMV) | Low; typically based on scrap commodity value |
| Data Handling | NIST 800-88 compliant wiping | Physical shredding or disintegration |
| Environmental Outcome | Best; supports circular economy and extends lifecycle | Good; recovers raw materials like gold and copper |
| Asset Criteria | Functional gear under 5 years old | Obsolete, damaged, or non-functional gear |
The key is to sort by condition, not convenience. If hardware can be reused, treat it that way. If it can't, send it to certified recycling. That way, disposition does more than recover dollars; it also cuts waste.
Step 4: Cut environmental impact and close out the project
Once the assets are sorted, the last job is to document the results and wrap up the project without loose ends.
Prioritize reuse and certified recycling to support zero-waste goals
Reuse cuts manufacturing demand and keeps equipment out of the waste stream. Any asset that can be sanitized and resold stays in use longer and reduces the need to make new hardware.
If equipment can't be reused, certified recycling is the right next step. It recovers materials that can go back into new manufacturing, which supports circular-economy goals.
For California-regulated e-waste, work with a fully compliant recycler that provides secure data destruction and landfill-free handling. Rica Recycling meets those requirements and serves businesses and schools across the Bay Area.
That said, these disposition decisions only count if the final records show exactly where each asset ended up.
Track the reports that matter for audits, ESG, and project closeout
Closeout records help protect audits, ESG reporting, and any dispute that shows up later.
At this stage, collect the documents that back up audit and ESG needs, including:
- A serialized inventory reconciliation
- Certificates of Destruction
- Chain-of-custody logs
- A Certificate of Recycling for recycled assets
- A gap analysis for large projects to flag missing assets early
These records also flow straight into ESG reporting. Diversion rates and recovered material weights are the metrics most likely to show up in annual reports and vendor audits.
Conclusion: Key steps for a secure and responsible decommissioning process
With recovery done and records compiled, close out the project against the original inventory.
Secure decommissioning works best when recovery happens before recycling, and every asset has a documented final state.
FAQs
How do I choose onsite vs. offsite destruction?
Choose the option that fits your security, compliance, and day-to-day needs. Onsite destruction is often the better pick when you want maximum security and want to watch the media get destroyed before it leaves your facility.
Offsite destruction can also be secure when it’s handled by a certified partner like Rica Recycling. With tracked transport and a tamper-proof Certificate of Destruction, you get a clear audit trail.
What assets are most often missed during decommissioning?
Assets often slip through the cracks when teams track items one by one instead of keeping inventory at the rack level. The items most often missed are small pieces that still hold data, like backup devices, data left on decommissioned firewalls, and passwords cached in printers.
There’s another common problem: equipment gets removed faster than the records get updated. When that happens, embedded systems, specific drives, and even network cables can go missing or end up in the wrong place. A detailed inventory with serial numbers helps close those gaps.
How can I prove full chain of custody for every asset?
Use a documented process that tracks each device from decommissioning to final disposition. Start with a verified inventory at the serial-number level, using tools like barcodes or RFID tags.
During transit, use secure transport with GPS tracking, tamper-evident seals, and detailed handoff logs that include timestamps and signatures. At the end, get serialized certificates of destruction or reuse for each asset.
Rica Recycling includes these audit-ready documentation practices in its certified IT asset recovery services.