
Secure Data Destruction in IT Asset Recovery
If you retire IT equipment without verified data destruction, you can still leak data. This article makes one point clear: wiping a device fast is not enough, and every retired asset needs a documented path from inventory to final disposition.
Here’s the short version:
I treat data destruction as a required step in IT asset recovery, not an afterthought.
I use NIST SP 800-88 Rev. 2 to choose between Clear, Purge, and Destroy.
I match the method to the media type:
HDDs: overwrite, secure erase, or degauss
SSDs/NVMe: cryptographic erase or sanitize commands
Failed or high-risk media: physical destruction (such as hard drive shredding)
I don’t forget devices that often store data in the background, like printers, copiers, firewalls, phones, backup tapes, and USB drives.
I keep chain-of-custody records, verification logs, and per-asset certificates.
I choose onsite or offsite handling based on risk, volume, and whether the device will be reused or destroyed.
A few facts in the article show why this matters: the 2024 Data Breach Report tracks improper disposal as a cause of U.S. breaches, and Morgan Stanley paid $60 million in 2020 tied to poor disposal of retired devices.
Bottom line: if you want to reuse, sell, donate, recycle, or discard old IT assets, I’d put data sanitization and proof of completion in the middle of that workflow every time.
Types of Data Sanitization Explained | Secure Data Destruction & ITAD Best Practices
Standards and compliance rules that shape data destruction decisions
U.S. rules such as HIPAA, GLBA, and PCI DSS require secure disposal, but they don't tell you exactly how to do it. In day-to-day practice, NIST SP 800-88 Rev. 2 is the main U.S. technical standard teams use for media sanitization across sectors.[10][2][13] That standard sets up the device-level decisions that come next.
How NIST SP 800-88 Rev. 2 guides Clear, Purge, and Destroy decisions
NIST SP 800-88 Rev. 2 uses a simple framework: Clear, Purge, and Destroy. The right path depends on the sensitivity of the data, the kind of media involved, and whether the device will stay under your control or leave it.[3][2][13]
For many SMBs, the most workable approach is pretty simple. Start by classifying the data on the device. Then identify the media type. After that, match the sanitization method to the end-of-life plan.
Low-sensitivity HDDs that will be reused in-house may qualify for Clear. But devices leaving your organization for resale, donation, recycling, or transfer to an IT asset recovery provider should get Purge at minimum, especially if they stored regulated data or data with moderate or high sensitivity. Destroy is the safer choice for high-sensitivity data or for damaged devices that can't be purged with confidence. For SSDs, use cryptographic erase for Purge. Overwriting by itself does not reliably sanitize every flash cell.[4][6]
The U.S. Department of Health and Human Services Office for Civil Rights (HHS OCR) has referenced NIST SP 800-88 in guidance on ePHI disposal, stating that PHI is securely disposed when electronic media are "cleared, purged, or destroyed consistent with NIST SP 800-88."[12] And enforcement is not just theoretical. The Office of the Comptroller of the Currency fined Morgan Stanley $60 million in 2020 for improper disposal of decommissioned devices that led to a data breach.[11] Same lesson in both cases: the standard helps pick the method, and enforcement means you need records to back it up.
Why written policies, records, and certificates matter for audits
Once you've picked the method, paperwork shows the job was done the right way. Sanitization only becomes auditable when someone else can trace it from inventory through final disposition.
A solid policy should spell out:
Scope
Approved methods
Owner responsibilities
Exception handling
Record retention
HIPAA, for example, has a six-year documentation retention rule, so destruction records should line up with that timeline.[5][7][8]
A Certificate of Data Destruction or Sanitization should serve as the audit record. And it needs to be more than a signed sheet of paper. It should include the device type, manufacturer, model, and serial number; the NIST category and exact method used; the date, time, and location of destruction; verification results; and the device's final disposition. If serial numbers and method details are missing, the certificate doesn't carry much audit weight.
Certificate Element | Why Auditors Need It |
|---|---|
Serial number / asset tag | Links the certificate to a specific physical device |
NIST category and method | Proves the method matched the data sensitivity and risk level |
Date, time, and location | Establishes when and where destruction occurred |
Verification results | Confirms the process was checked, not just performed |
Final disposition | Shows whether the device was reused, recycled, or destroyed |
Authorized signatures | Provides accountability from both provider and client |
Those records also support the chain-of-custody controls covered next.
One practical note: confirm your exact obligations with a legal or compliance advisor before you lock in your policy. NIST SP 800-88 Rev. 2 is the technical baseline, but your rule set depends on your industry, the data you handle, and the contracts you sign.
Data destruction methods for common business devices
Pick the method based on media type and what you plan to do with the device next. In practice, that means choosing Clear, Purge, or Destroy in a way that removes data without throwing away hardware that still has life left in it. From there, the job is simple: match the method to the device class.
Choosing the right method for HDDs, SSDs, servers, laptops, mobile devices, and backup media
For spinning media, the call is usually simple. HDDs can often be cleared by overwriting all addressable sectors. For Purge, ATA Secure Erase or degaussing are common options. There’s one big catch: degaussing makes an HDD permanently unusable, so it only makes sense when reuse is off the table.
Flash storage plays by different rules. SSDs need different handling because standard overwriting is unreliable. Why? Flash storage remaps data into rewritten sectors, so an overwrite may not touch everything you think it touched. For Purge, use cryptographic erase on self-encrypting drives or run the NVMe or ATA sanitize command. Degaussing is for magnetic media only and does nothing to flash. If you can’t confirm sanitization, shredding or disintegration is the safer move.
Servers and storage arrays need a full component inventory before sanitization starts. That means every drive, cache module, and embedded flash chip. Miss one tiny module, and you’ve got a problem. Each part needs its own sanitization call based on media type and data sensitivity.
Laptops and mobile devices follow the same logic as the drives inside them, but there’s an extra wrinkle: a factory reset by itself is not a reliable sanitization method unless the vendor says it is. For mobile devices with sensitive data, use remote wipe plus strong encryption, or destroy units that are damaged.
Printers, copiers, and networking gear get missed all the time. That’s risky. Multifunction printers may store images of every document they scanned or printed on an internal HDD or flash module. Managed switches and firewalls can hold configuration data and logs. Before disposal, check for internal storage, then sanitize it or remove the media.
Tape and optical media are a different animal. Tape is usually destroyed. Degaussing applies only to magnetic tape when reuse is planned. Optical discs can’t be degaussed at all. For both, the standard Destroy methods are shredding, pulverizing, or incineration.
Logical erasure vs. physical destruction: security, resale value, and environmental tradeoffs
Logical erasure keeps the hardware usable, holds onto resale or redeployment value, and cuts e-waste. A sanitized laptop can go back into service, be sold, or be donated. For SMBs trying to stretch IT dollars, that matters.
Physical destruction does the opposite. It removes any chance of data recovery, but it also wipes out any chance of getting value back from the hardware.
A simple rule works well here:
Use logical erasure when the device still works, the media type supports a validated sanitization method, and you want to keep the asset’s value.
Use physical destruction when the drive has failed, when erasure can’t be verified, or when policy or regulatory risk calls for irreversible disposal.
Method | Suitable Media | Typical SMB Use Case | Reuse/Resale Value | E-waste Impact | Documentation Needs |
|---|---|---|---|---|---|
Logical erasure (overwrite / secure erase) | HDDs, supported SSDs | Redeployment, resale, donation, lease return | High | Lower; extends asset life | Tool name/version, method, serial number, verification log |
Cryptographic erase | SSDs, NVMe, mobile devices | Fast Purge of encrypted modern drives | High | Low | Erase command used, completion log, serial number |
Degaussing | HDDs, magnetic tape only | Magnetic-media Purge when reuse isn't needed | Low to none | Ends reuse for magnetic media | Magnet strength, method, serial number |
Physical destruction (shredding / disintegration) | All media types | Failed drives, high-sensitivity data, strict policies | None | Higher; generates scrap for recycling | Chain of custody, destruction certificate, shred size |
Media-type decision table: selecting Clear, Purge, or Destroy
Use the table below to map common business assets to the right NIST category.
Asset Type | Recommended NIST Category | Common Sanitization Method | Key Limitations |
|---|---|---|---|
HDD | Clear or Purge | Single-pass overwrite; ATA Secure Erase; degaussing | Degaussing renders the drive unusable |
SSD / NVMe | Purge or Destroy | Cryptographic erase; NVMe/ATA sanitize; shredding or disintegration | Standard overwrite and degaussing are unreliable on flash media |
Laptop / Desktop | Matches internal drive type | Clear or Purge for working drives; Destroy for failed drives | Identify all internal storage components, including secondary drives |
Mobile device | Clear, Purge, or Destroy | Factory reset plus overwrite where supported; remote wipe with strong encryption; shredding for damaged units | Factory reset alone is not enough unless the vendor defines it as one |
Printer / Copier drive | Clear, Purge, or Destroy | Overwrite or vendor reset utilities; cryptographic erase if available; remove the storage media and shred it | Internal storage is frequently overlooked before resale or donation |
Tape media (LTO/DLT) | Purge or Destroy | Degaussing for magnetic tape when reuse is planned; shredding or incineration | Optical discs require physical destruction |
Once you’ve picked the method, document every handoff and verify that the process finished before the device leaves your control. At that point, chain of custody and verification become the next thing that matters most.
Chain of custody, verification, and onsite vs. offsite handling
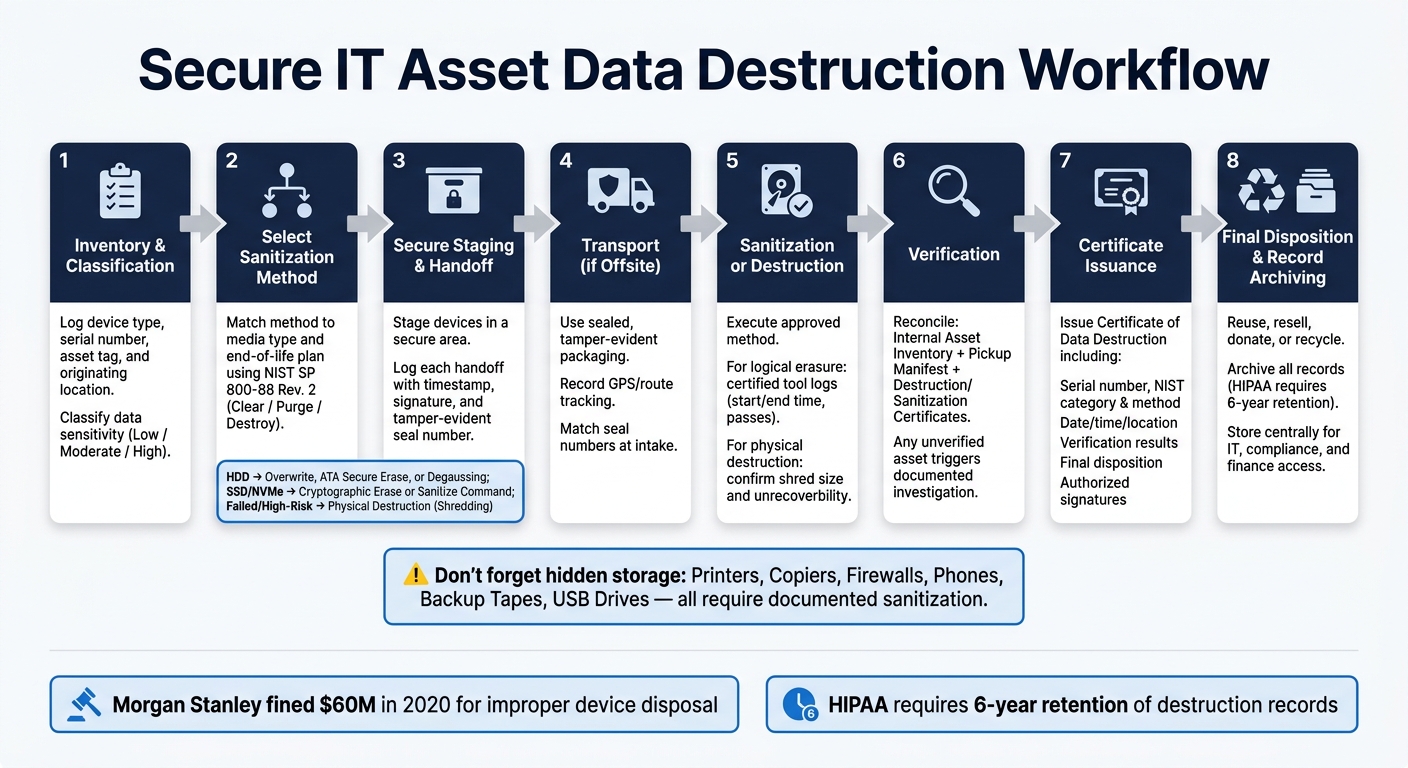
Secure IT Asset Data Destruction Workflow: From Inventory to Final Disposition
After you choose Clear, Purge, or Destroy, the next step is custody and verification. Picking the right sanitization method is only half the work. You also need proof that every asset was tracked, sanitized, and checked. That proof comes from chain-of-custody records and per-asset verification logs.
Building a documented chain of custody from pickup to final disposition
A complete chain of custody starts the moment a device leaves its normal operating environment, not when it reaches a processing facility. Every handoff across pickup, transport, intake, processing, and final disposition should be recorded.[17][24][26]
Each asset record should include the device type, manufacturer, model, serial number, capacity, internal asset tag, and originating location. If devices are coming from more than one office or department, a pre-inventory by site helps stop gaps before they happen and keeps transfers traceable.[24][28]
Tamper-evident packaging matters during transport. Sealed bins, pallet wraps, or numbered tamper-evident bags, with seal numbers logged next to asset serials, help show that containers were not opened between pickup and intake.[17][27] A signed pickup manifest listing each asset, the date and time, the pickup location, and the names of both the SMB representative and the receiving technician creates the first formal link in the chain.[17][26]
Every transfer should be logged with a timestamp and a signature or digital acknowledgment. Where possible, GPS or route tracking should be included too. At intake, the receiving facility should confirm that seal numbers match the pickup manifest and record any discrepancy and corrective action.[17][24][27][28]
Onsite vs. offsite destruction: which model fits your SMB
Once custody tracking is in place, choose the handling model that fits your risk level and volume. The right pick comes down to where you want the risk to sit and how much documentation your team can support.
Factor | Onsite Destruction | Offsite Destruction |
|---|---|---|
Visibility | Highest; staff can witness the event directly | Lower during transport; relies more on documentation |
Cost | Typically higher due to mobile equipment and labor | Often lower for larger volumes or routine work |
Operational disruption | Moderate to high during the event | Lower; technicians collect and stage equipment quickly |
Scalability | Best for concentrated, one-time projects | Better for larger volumes and multi-site cleanouts |
Chain-of-custody complexity | Lower; media never leaves intact | Higher; custody must be proven across pickup, transit, and intake |
Common use cases | Small office cleanouts, highly regulated environments needing witnessed destruction, one-time large server or storage array retirements | Regular device refresh cycles, multi-office SMBs consolidating assets, and projects where resale or refurbishment is desired after secure erasure |
Many Bay Area SMBs use a hybrid approach: onsite destruction for the most sensitive media, and offsite erasure or destruction for everything else. For offsite work, strong manifests, sealed transport, and intake verification are a must if you want to keep an unbroken trail.[17][23][25][27][28]
Verification steps and what a strong certificate should include
Before final disposition, reconcile the asset list, transport records, and destruction results. Verification needs to confirm that the chosen method worked on each asset.[9]
For logical erasure, certified tools should produce logs with start and end times, overwrite passes or cryptographic erase events completed, and a routine confirming that data is unrecoverable. For physical destruction, the documentation should note the destruction specification and confirm that the media was confirmed unrecoverable. If an asset fails sanitization, the record should show the failure, the corrective action taken, and the final outcome.[19][24]
Before a project closes, reconcile three records:
Your internal asset inventory
The pickup manifest
The destruction or sanitization certificates
Any unverified or missing item should trigger a documented investigation, not a blank line.[17][25]
A strong certificate should also include the following, in addition to the fields covered in the prior section:[16][18][19][20][21][22][24]
Project reference ID: Links the certificate to a specific engagement or batch
Per-asset outcome: Pass/fail or accept/reject status recorded for each individual device
Intake and transport verification: Seal number match confirmation and any discrepancies logged at intake
Building a secure data destruction program with a certified local partner
A repeatable SMB workflow for secure device retirement
Once the method, custody, and verification rules are set, the next step is putting them into a process your team can repeat without guesswork.
A secure data destruction program only works if it follows the same path every single time, whether you're retiring a few office laptops or emptying a server room. The workflow is pretty simple: inventory each asset, classify it, stage it in a secure area, log each handoff, sanitize or destroy the media, verify the result, complete final disposition, and archive the records.
That same flow works for office endpoints, failed drives pulled from servers, and small server-room assets. What matters most is consistency. If the process changes from one batch to the next, that's when steps get missed.
A local partner should mirror that same workflow from start to finish, including pickup, logging, verification, and certificate delivery.
How Rica Recycling supports Bay Area organizations with secure IT asset recovery
For Bay Area SMBs, schools, and organizations, Rica Recycling provides certified electronics recycling and IT asset recovery with pickup and drop-off, secure data destruction with destruction certificates, and regulatory-compliant handling for computers, laptops, servers, and other electronics.[15]
Rica Recycling operates under a 100% landfill-free policy, so shredded material is handled responsibly instead of being sent to a landfill.[1][31]
Conclusion: the controls that protect data and support compliant IT asset recovery
Secure data destruction isn't just a last box to check. It's a set of controls that runs through the full IT asset recovery process. It starts with a written policy that defines scope, roles, media-specific methods, and record retention.[1][14][29]
From there, the core controls are clear: match the sanitization method to the media type and data sensitivity, keep an unbroken chain of custody from collection through final disposition, verify each result and document exceptions, and store certificates and logs in one central place that compliance, IT, and finance teams can access.[29][30][31]
Strong security and responsible recycling should work together at end-of-life, not as separate programs, but as two results of the same disciplined process.
FAQs
How do I choose between Clear, Purge, and Destroy?
Choose based on data sensitivity, reuse goals, and compliance needs.
Clear: Uses software overwriting. It costs less and keeps devices usable for reuse.
Purge: Uses methods like cryptographic erasure or degaussing. It offers stronger protection and still allows reuse.
Destroy: Uses physical destruction, such as shredding or incineration. It’s the best fit for highly confidential data, but the device can’t be used again.
What devices are often missed during data destruction?
Organizations often pay close attention to servers and laptops. Printers, though, tend to slip under the radar.
That’s a problem, because many printers have internal hard drives or memory caches that can store sensitive documents and other data.
The same goes for other office equipment, including networking gear. These devices can hold configuration files and credentials, which means they should go through the same data removal steps as primary computing assets.
When should I use onsite instead of offsite handling?
Choose onsite data destruction when the data is highly sensitive, like financial, healthcare, or government records. It cuts out transport risk and lets your team watch the process firsthand at your facility.
Choose offsite handling when you need more flexibility or you're dealing with a large volume of equipment. You can also split the difference with a hybrid setup: use onsite for critical assets and offsite for less sensitive, high-volume equipment.